
Few appetizers generate as much excitement at parties as buffalo chicken bombs – those golden, flaky parcels that explode with spicy, cheesy buffalo chicken when you bite into them. I discovered these at a friend’s Super Bowl party years ago, and I’ve been making them ever since because they disappear faster than anything else I put on the table. What makes them so irresistible is the combination of textures and flavors: crispy, buttery biscuit exterior giving way to a creamy, spicy filling loaded with tender chicken, tangy buffalo sauce, and melted cheese. They’re essentially buffalo chicken dip wrapped in biscuit dough, which is genius when you think about it. The best part is how simple they are to make – if you can open a can of biscuits and mix ingredients in a bowl, you can make these. They require no special skills, no fancy equipment, and less than an hour from start to finish. Whether you’re hosting game day, looking for a crowd-pleasing appetizer for a potluck, or just want something fun and delicious for dinner, buffalo chicken bombs deliver every single time. They’re hand-held, easy to eat, endlessly customizable, and guaranteed to impress anyone who tries them. Once you master the basic technique, you’ll find yourself making them for every gathering because they’re that good and that easy.
What Makes Buffalo Chicken Bombs Special
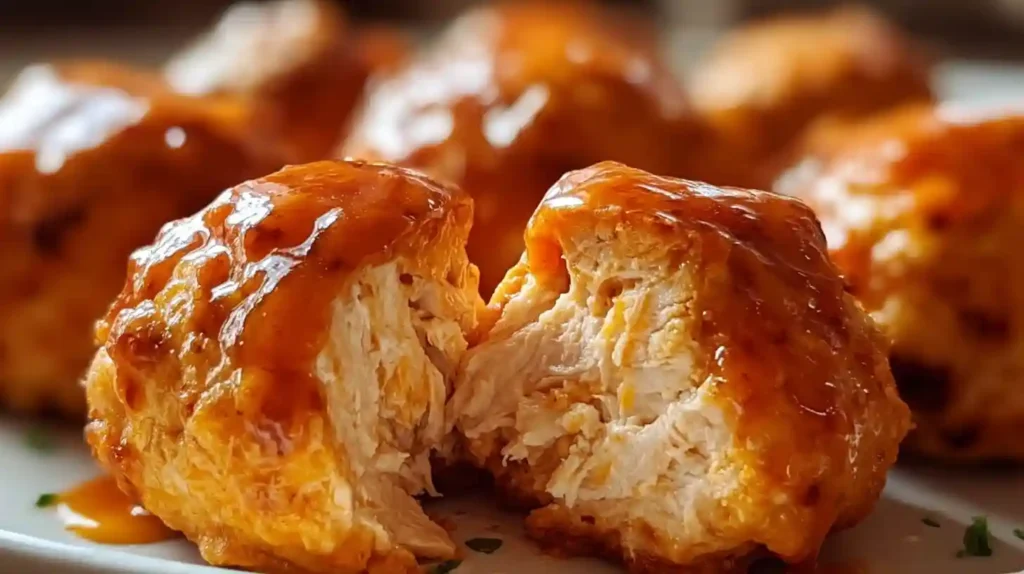
Buffalo chicken bombs take all the best elements of buffalo chicken wings and buffalo chicken dip and package them into convenient, handheld portions [web:35][web:36]. The filling combines shredded chicken with cream cheese, buffalo sauce, and shredded cheese to create a mixture that’s creamy, tangy, spicy, and rich all at once. The cream cheese provides body and mellows the heat of the buffalo sauce, while the shredded cheddar or mozzarella adds stretchy, melty goodness. The chicken itself soaks up all those flavors while providing protein and substance. This filling gets wrapped in refrigerated biscuit dough, which bakes up golden and flaky around the edges while staying soft where it meets the filling [web:37][web:42].
The genius is in the format – these are much easier to eat than traditional buffalo wings with no bones to navigate and no messy fingers. They’re also more substantial than wings, making them satisfying enough to serve as a light meal rather than just an appetizer. The biscuit dough acts as both wrapper and built-in bread, so you get that satisfying carb element that pairs so well with buffalo chicken flavor. Brushing the tops with extra buffalo sauce before and after baking ensures you get that iconic orange color and tangy buffalo taste in every bite [web:35]. They’re best served warm when the cheese is still melty and the biscuit is crisp, though they’re honestly delicious at any temperature. Served with ranch or blue cheese dressing for dipping, they deliver all the flavors of buffalo wings without the mess.
Choosing Your Chicken
The chicken is the foundation of these bombs, so choosing the right type and preparing it properly matters. Rotisserie chicken is the MVP here – it’s already cooked, seasoned, and incredibly convenient [web:35]. One rotisserie chicken yields about three to four cups of shredded meat, which is enough for two to three batches of bombs. Just pull the meat off the bones, discard the skin, and shred it with your hands or two forks. The meat from rotisserie chicken is moist and flavorful, giving you excellent results with zero cooking effort. You can find rotisserie chickens at virtually any grocery store, often for less than cooking chicken yourself would cost.
If you prefer to cook your own chicken, you have several options [web:36][web:40]. Poaching chicken breasts in simmering water or broth for about fifteen to twenty minutes produces tender, shreddable meat. Season the water with salt, peppercorns, and maybe a bay leaf for extra flavor. Baking chicken breasts at 375°F for twenty-five to thirty minutes works well too. Season them with salt and pepper, brush with a little oil, and bake until they reach 165°F internally. Let the chicken cool slightly before shredding. Slow cooker chicken is another excellent option – throw chicken breasts in your slow cooker with a bit of broth, cook on low for four to six hours, and you’ll have incredibly tender, easy-to-shred chicken.
For the most flavorful results, season the chicken before adding it to the filling or use well-seasoned rotisserie chicken. Leftover grilled chicken works beautifully if you have some on hand. Even canned chicken in a pinch will work, though it lacks the texture and flavor of fresh or rotisserie chicken. Chop or shred the chicken fairly small so it mixes well with the other filling ingredients and doesn’t create huge chunks that make the bombs hard to seal. You want pieces small enough to distribute evenly but large enough to provide good chicken flavor and texture in each bite.
The Perfect Filling
The filling is where these bombs get their incredible flavor, and getting the proportions right ensures the best results. Start with room temperature cream cheese – this is crucial because cold cream cheese won’t mix smoothly and will leave lumps [web:35][web:42]. Four to eight ounces of cream cheese provides the creamy base that holds everything together and tempers the heat of the buffalo sauce. Let it sit on the counter for about an hour before using, or soften it carefully in the microwave for fifteen to twenty seconds. Once softened, whisk it with the buffalo sauce until completely smooth and combined. This creates an emulsified base that coats the chicken beautifully.
Frank’s RedHot is the classic buffalo sauce choice, though any buffalo wing sauce you enjoy will work [web:37][web:43]. Start with about a quarter to a third cup of sauce for eight ounces of cream cheese. You can always add more if you want it spicier, but it’s hard to tone down if you add too much. Mix the sauce thoroughly with the cream cheese before adding the chicken and cheese. This ensures the buffalo flavor distributes evenly throughout the filling. Add your shredded chicken and mix well – you want every piece of chicken coated with the creamy buffalo mixture. The chicken should be well incorporated but not mushy.
The cheese adds both flavor and texture to the filling. Sharp cheddar provides tangy, bold flavor that stands up to the buffalo sauce [web:35][web:36]. Mozzarella offers mild, creamy, stretchy qualities that create those amazing cheese pulls when you bite into the bombs [web:38][web:42]. Many recipes use a combination of both, which gives you the best of both worlds. Pepper jack cheese is another excellent choice for those who want extra heat and a little Southwest flair [web:43]. Shred the cheese yourself rather than using pre-shredded for better melting. Add about half a cup of shredded cheese to the mixture along with some finely diced green onion or chives for a fresh onion flavor and pop of color [web:35][web:38].
Selecting Biscuit Dough
The biscuit dough you choose significantly impacts the final texture and success of your buffalo chicken bombs. Refrigerated biscuit dough in a can is the standard choice and works perfectly [web:35][web:36][web:37]. Look for regular buttermilk biscuits – not the flaky layers variety. Flaky biscuits tend to separate when you try to seal the filling inside, making them harder to work with and more likely to open up during baking [web:35]. Pillsbury Grands or similar store brands work beautifully. An eight-count can makes eight bombs, which serves four to six people as an appetizer or two to three people as a main course.
Some recipes call for separating each biscuit into two thinner rounds to make sixteen smaller bombs from one can [web:39]. This works well if you want bite-sized appetizers or need to stretch your ingredients further. The smaller size also means they bake faster and get crispier. However, the larger bombs made from whole biscuits are more impressive and substantial. Choose based on your preference and what you’re serving them for. Frozen dinner roll dough is another excellent option that some people prefer [web:38]. Rhodes frozen rolls need to thaw for forty-five to sixty minutes before using, but they create a softer, more bread-like exterior that some find more appealing than biscuit dough.
Homemade biscuit dough works too if you’re feeling ambitious, though the convenience of refrigerated dough is hard to beat for this recipe. If using homemade dough, roll it out to about a quarter-inch thickness and cut rounds that are roughly four to five inches in diameter. The dough should be pliable enough to stretch and seal around the filling without tearing. Avoid dough that’s too thick, as it won’t cook through properly, or too thin, which can tear and leak during baking. Room temperature dough is easier to work with than cold dough, so let refrigerated cans sit out for about ten minutes before opening.
Assembly Technique
Assembling buffalo chicken bombs requires a gentle touch but isn’t difficult once you get the hang of it. Start by preheating your oven to 350-375°F depending on the recipe you’re following [web:35][web:36][web:37]. Prepare your baking surface – either a greased baking sheet or a greased cast-iron skillet works well. The skillet creates a more rustic presentation and keeps the bombs snuggled together, which helps them maintain their shape [web:35][web:42]. A baking sheet gives you more control over spacing and allows the bombs to get crispy on all sides. Spray whichever you choose generously with nonstick cooking spray.
Open your can of biscuits and separate them onto a clean work surface. Using your hands or a rolling pin, flatten each biscuit into a round that’s about four to five inches in diameter and roughly an eighth to a quarter inch thick [web:35][web:36]. Don’t worry about making perfect circles – rustic shapes work just fine. The goal is to create enough surface area to wrap around the filling. Place about two to three tablespoons of filling in the center of each flattened biscuit. Don’t overfill – too much filling makes the bombs impossible to seal and likely to burst open during baking. It’s better to err on the side of less filling than more.
Gather the edges of the biscuit dough up and over the filling, pinching them together at the top to seal [web:35][web:38][web:39]. Work carefully but firmly, making sure there are no gaps where filling can escape. If the dough isn’t sealing well, lightly wet your fingers with water and use the moisture to help the dough stick together. Once sealed, gently roll the bomb between your palms to create a smooth ball shape. Place it seam-side down in your prepared pan – this is important because it keeps the seam from opening during baking. Continue until all bombs are assembled and arranged in the pan. If using a skillet, pack them fairly close together. On a baking sheet, leave about an inch of space between each one for even browning.
Baking for Golden Perfection
Before baking, brush the tops of the bombs with buffalo sauce [web:35][web:40]. This step is essential for achieving that signature orange color and tangy buffalo flavor on the exterior. Use about two tablespoons of buffalo sauce and brush it generously over the top of each bomb. Don’t skip this step – it makes a huge difference in both appearance and flavor. Some recipes also call for brushing the bombs with melted butter mixed with ranch seasoning, which creates a different but equally delicious flavor profile [web:39][web:40]. You can do buffalo sauce, butter mixture, or even both.
Bake the bombs for twenty to twenty-six minutes, depending on your oven and the size of your bombs [web:35][web:36][web:37]. You’re looking for deep golden brown color all over. The biscuit dough should be cooked through with no raw, doughy spots. The bottoms should be golden and slightly crispy. If you’re unsure whether they’re done, check one by cutting it open – the dough should be fluffy and cooked through, not dense or gummy. If the tops are browning too quickly before the dough is cooked through, tent the pan loosely with foil and continue baking. Conversely, if they’re taking too long to brown, you can increase the temperature slightly or move them to a higher rack.
As soon as the bombs come out of the oven, brush them with more buffalo sauce while they’re still hot [web:35]. The hot bombs will absorb some of the sauce, creating extra flavor. Sprinkle the tops with finely diced green onions or chives for color and fresh onion flavor. Let the bombs cool for just a few minutes before serving – you want them warm enough that the cheese is still melty inside, but not so hot that they burn your mouth. They’re best served within the first fifteen to twenty minutes after baking when everything is at peak temperature and texture. Arrange them on a serving platter with bowls of ranch and blue cheese dressing for dipping.
Serving Suggestions
Buffalo chicken bombs are incredibly versatile and work for various occasions and serving styles. As an appetizer, they’re perfect for game day parties, Super Bowl gatherings, tailgates, or any casual get-together [web:36][web:40]. Arrange them on a large platter with celery sticks, carrot sticks, and small bowls of ranch and blue cheese dressing for dipping. The vegetables provide a fresh, crunchy contrast to the rich bombs and help balance the heat. You can also serve them with extra buffalo sauce for those who want even more spice. One batch of eight bombs serves six to eight people as an appetizer alongside other snacks.
For a light dinner or lunch, serve two to three bombs per person with a substantial side. A crisp green salad with ranch dressing ties in with the buffalo chicken flavors while adding freshness and vegetables. Coleslaw provides cool, crunchy contrast that pairs beautifully with the spicy chicken. French fries or sweet potato fries make the meal more substantial and play into that classic bar food vibe. Mac and cheese is indulgent but delicious if you’re going all-in on comfort food. For beverages, cold beer is classic with buffalo chicken flavors – try a light lager or IPA. Iced tea, lemonade, or soda work well for non-alcoholic options.
These bombs also work wonderfully for meal prep. Make a double batch and store leftovers for quick lunches or snacks throughout the week. They’re great for kids’ lunches – pack them cold or warm with a small container of ranch for dipping. They make excellent potluck contributions because they’re easy to transport and can be served at room temperature if necessary. For parties, you can keep them warm in a slow cooker set to low, though they’re best fresh from the oven. Consider making a variety of flavors if you’re serving a crowd – try barbecue chicken bombs or pizza bombs using the same basic technique with different fillings.
Variations and Customizations
Once you master the basic buffalo chicken bomb, you can customize them endlessly to suit different tastes and preferences. For heat level variations, adjust the amount of buffalo sauce in the filling – less for milder bombs, more for spicier ones. You can also add diced jalapeños or a pinch of cayenne pepper to the filling for extra kick. For those who can’t handle much heat, use mild wing sauce or even barbecue sauce instead of buffalo sauce. Adding a tablespoon or two of ranch dressing to the filling helps cool the heat while adding tangy flavor.
Cheese variations change the character significantly. Blue cheese crumbles mixed into the filling create an authentic buffalo wing experience for blue cheese lovers [web:37][web:42]. Monterey Jack cheese is milder than cheddar and melts beautifully. A Mexican cheese blend works well if you want to take the flavors in a Southwestern direction. Gouda adds smokiness that pairs wonderfully with the buffalo sauce. You can also experiment with different proteins. Ground turkey or ground chicken mixed with buffalo sauce creates a different texture. Shrimp tossed in buffalo sauce makes elegant seafood bombs. Even vegetarian versions using cauliflower buffalo “chicken” work surprisingly well.
For the exterior, try brushing the bombs with garlic butter instead of buffalo sauce for a milder, garlicky flavor. Mix melted butter with minced garlic, Italian herbs, and Parmesan for an Italian twist. Everything bagel seasoning sprinkled on top before baking adds great flavor and crunch. You can also add bacon bits to the filling for extra richness and smokiness. Diced water chestnuts provide unexpected crunch. Fresh herbs like cilantro or parsley mixed into the filling add brightness. The basic technique is so versatile that once you understand it, you can create countless variations based on what you have on hand and what flavors you crave.
Make-Ahead and Storage
Buffalo chicken bombs can be prepped ahead in several ways to make entertaining easier. You can make the filling up to two days in advance and store it covered in the refrigerator [web:38]. Bring it to room temperature before assembling, or the cold filling will make the dough harder to work with. You can also assemble the bombs completely, arrange them on a baking sheet, and refrigerate them for several hours before baking. Just add a few extra minutes to the baking time since they’ll be starting cold. This is perfect for party prep – assemble everything in the morning, refrigerate, and bake right before guests arrive.
For longer storage, assembled unbaked bombs freeze beautifully. Place them on a baking sheet and freeze until solid, then transfer to a freezer bag or container. They’ll keep frozen for up to three months. Bake directly from frozen, adding about ten extra minutes to the baking time. There’s no need to thaw, which makes them incredibly convenient. Baked bombs can be refrigerated for up to three days in an airtight container. Reheat them in a 350°F oven for about ten minutes until warmed through and crispy again. The microwave works in a pinch but won’t give you the crispy exterior that makes these so good.
Leftover filling stores well refrigerated for up to four days. You can use it as a dip for chips or vegetables, spread it on bread for sandwiches, or stuff it into peppers or mushrooms for a different preparation. If you have leftover biscuit dough and not enough filling, make garlic knots or mini cinnamon rolls with the extra dough so nothing goes to waste. For best results, only make as many bombs as you’ll eat fresh, but knowing they freeze well means you can double the recipe and stock your freezer with ready-to-bake snacks for impromptu gatherings or quick dinners.
Troubleshooting Common Issues
If your bombs are bursting open during baking, you’re likely overfilling them or not sealing them properly. Use less filling and make sure to pinch the seams very firmly, using water to help seal if needed. Placing them seam-side down is crucial. If they’re still bursting, try chilling the assembled bombs for fifteen to twenty minutes before baking, which helps the seams set. Bombs that are doughy or undercooked in the middle need longer baking time or higher temperature. Make sure your oven is properly preheated and consider baking at 375°F instead of 350°F. Cutting the biscuits thinner also helps ensure they cook through.
If the filling is too runny and leaking out, you probably used too much buffalo sauce or didn’t use enough cream cheese. The mixture should be thick enough to hold its shape when scooped. Chill the filling for thirty minutes before assembling to firm it up [web:38]. If your bombs are too dry, you didn’t use enough filling or you overbaked them. They should be golden brown but not dark brown. Check them at the lower end of the time range and remove them as soon as they’re done. Brushing with extra buffalo sauce or butter after baking helps add moisture back.
Bombs that are browning too quickly on top but not cooking through need to be tented with foil partway through baking. This allows the interior to cook without the exterior burning. If they’re spreading too much and losing their ball shape, the dough might be too warm. Work quickly and keep everything cool. You can also chill the assembled bombs briefly before baking. If the bottoms are burning before the tops brown, lower your oven rack or reduce the temperature slightly. Using parchment paper or a silicone mat on your baking sheet can also help prevent burning. Don’t be discouraged if your first batch isn’t perfect – these are forgiving and even imperfect bombs taste amazing.
Nutrition Considerations
Buffalo chicken bombs are indulgent comfort food, not health food, but they do offer some nutritional value alongside the deliciousness. Each bomb contains roughly two hundred to two hundred fifty calories, depending on size and exact ingredients. The chicken provides protein – about eight to ten grams per bomb – which makes them more substantial and satisfying than many appetizers. The cream cheese and shredded cheese contribute calcium and additional protein, though they also add saturated fat. The biscuit dough provides carbohydrates for energy. Buffalo sauce itself is relatively low in calories, mainly adding sodium and a small amount of fat from butter.
To make lighter versions without sacrificing too much flavor, use reduced-fat cream cheese and cheese, which cuts calories and fat significantly. Choose chicken breast meat rather than dark meat for less fat. You can reduce the amount of cheese in the filling or use a stronger-flavored cheese like sharp cheddar so you can use less while maintaining flavor. Baking spray instead of butter on the exterior saves calories. Using whole wheat biscuit dough adds fiber and nutrients. Adding vegetables like diced bell peppers or celery to the filling increases nutrition and volume without many calories.
For those watching sodium, the buffalo sauce and canned biscuits are the main sources. Using low-sodium buffalo sauce and making homemade biscuit dough from scratch dramatically reduces sodium. These bombs are naturally gluten-free if you use gluten-free biscuit dough, which is now available at many stores. They’re already quite high in protein for an appetizer, making them more satiating than carb-only snacks. While they’re not diet food, they’re reasonable as an occasional treat or when you’re feeding a crowd and want something special. Serving them with plenty of vegetables for dipping helps create a more balanced plate.
The Perfect Party Food
What makes buffalo chicken bombs ideal party food goes beyond just taste. They’re finger food that doesn’t require plates or utensils, making them perfect for mingling. They’re not as messy as traditional buffalo wings, so guests can eat them without worrying about sauce all over their hands and faces. The hand-held format means people can grab one while standing and chatting. They’re substantial enough that a couple of bombs actually fill people up, unlike chips or other light snacks that disappear without satisfying anyone. The combination of familiar flavors in a fun, slightly unexpected format generates conversation and interest.
From a host’s perspective, these are dream party food because they’re so easy to make ahead and bake right before serving. You can assemble them in the morning, refrigerate, and pop them in the oven when guests arrive. The house fills with an amazing aroma as they bake, which builds anticipation. They emerge from the oven looking impressive and special, even though they took minimal effort. They work for any casual gathering from game day to potlucks to birthday parties to holiday appetizer spreads. Adults and kids both love them, making them family-friendly. They’re budget-friendly too, feeding a crowd without expensive ingredients. A couple of cans of biscuits, a rotisserie chicken, and some cheese and buffalo sauce costs under fifteen dollars and feeds eight to ten people.
Frequently Asked Questions
Can I use canned chicken for buffalo chicken bombs?
Yes, canned chicken works in a pinch, though rotisserie or freshly cooked chicken tastes better and has better texture. If using canned chicken, drain it very well and flake it apart with a fork before mixing with the other ingredients. The flavor will be milder, so you might want to add extra buffalo sauce or seasonings.
Why are my buffalo chicken bombs leaking?
Leaking happens when the bombs aren’t sealed properly or are overfilled. Make sure to pinch the seams tightly and place them seam-side down. Use less filling – it’s better to underfill than overfill. Chilling the assembled bombs for fifteen minutes before baking also helps the seams seal better.
Can I make buffalo chicken bombs in an air fryer?
Absolutely! Air fryers work great for buffalo chicken bombs. Spray the basket with cooking spray, arrange the bombs in a single layer without touching, and air fry at 350°F for ten to twelve minutes until golden brown. You may need to work in batches depending on your air fryer size. They get very crispy in the air fryer.
How do I keep buffalo chicken bombs warm for a party?
Transfer baked bombs to a slow cooker set on low or warm. They’ll stay warm for several hours, though they’ll lose some crispiness. Alternatively, keep them warm in a 200°F oven on a baking sheet. For best results, bake them in batches throughout the party so there’s always a fresh, hot batch available.
Can I freeze assembled buffalo chicken bombs before baking?
Yes! Freeze assembled bombs on a baking sheet until solid, then transfer to a freezer bag. They keep for up to three months. Bake directly from frozen, adding about ten minutes to the baking time. This is perfect for having ready-to-bake snacks on hand for unexpected guests or quick dinners.
What can I substitute for buffalo sauce?
Barbecue sauce makes delicious BBQ chicken bombs. Teriyaki sauce creates an Asian-inspired version. Ranch dressing mixed with dill and garlic powder makes ranch chicken bombs. Pizza sauce with Italian seasonings creates pizza bombs. The technique works with any flavorful sauce you enjoy with chicken.
Why is my biscuit dough not sealing properly?
The dough might be too cold or too dry. Let canned biscuits sit at room temperature for ten minutes before using. Lightly wet your fingers with water and use the moisture to help seal the edges. Make sure you’re pressing firmly enough to actually seal the dough. Working with warm hands helps too.

Buffalo Chicken Bombs
Ingredients
Equipment
Method
- Preheat oven to 375°F. Spray a 10-inch oven-safe skillet or baking sheet with nonstick cooking spray.
- In a large mixing bowl, whisk together room temperature cream cheese and 1/4 cup buffalo sauce until smooth and well combined.
- Add shredded chicken, cheddar cheese, mozzarella cheese, and finely diced green onion to the cream cheese mixture. Stir until evenly combined. You should have about 2 1/2 cups of filling.
- Remove biscuits from can and place on a clean work surface. Using your hands or a rolling pin, flatten each biscuit to about 1/8-inch thickness (approximately 4-5 inches in diameter).
- Divide buffalo chicken mixture equally between each biscuit, using about 1/4 cup filling per biscuit. Place filling in the center.
- Gather the edges of each biscuit up and over the filling. Pinch edges together firmly to seal, forming a ball. If dough won’t seal, lightly wet fingers with water to help seal.
- Place sealed biscuits seam-side down in prepared skillet or on baking sheet. Using about 2 tablespoons buffalo sauce, brush the top of each biscuit. Reserve remaining buffalo sauce for later.
- Bake for 24-26 minutes, or until golden brown and cooked through.
- Remove from oven and immediately drizzle tops with reserved buffalo sauce. Garnish with additional finely diced green onions.
- Let cool for 2-3 minutes before serving. Serve warm with ranch or blue cheese dressing for dipping.