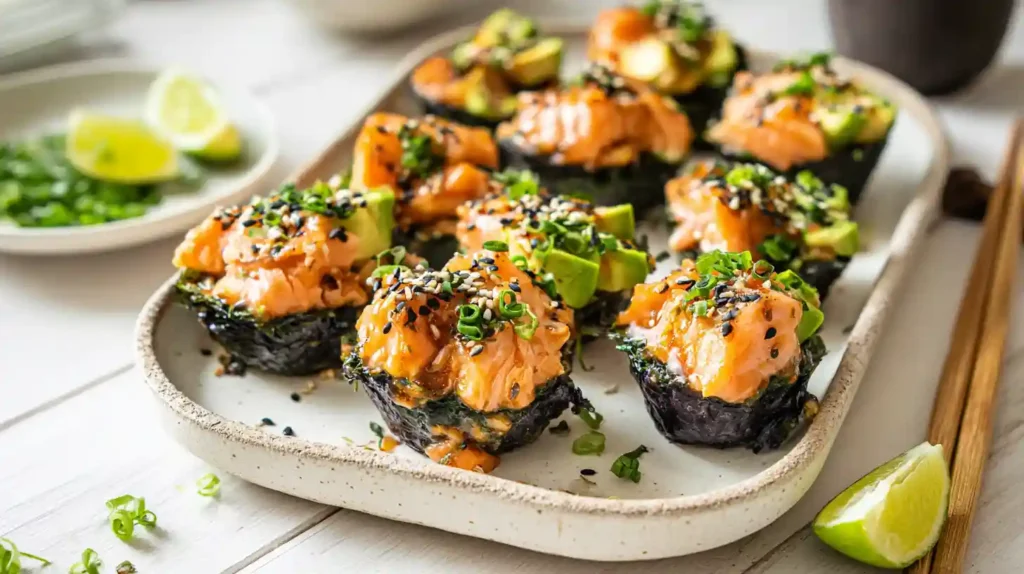
Last month, I scrolled past a video of these adorable little cups and couldn’t stop watching. Crispy nori shells cradling fluffy sushi rice and tender salmon, all baked to golden perfection. The person in the video took one bite, and you could see their eyes light up. That’s when I knew I had to try Salmon Sushi Cups myself. I grabbed some fresh salmon on my next grocery run, pulled out my dusty muffin tin, and spent a Saturday afternoon playing around in the kitchen. The first batch disappeared so fast I barely got a taste. My husband ate four in one sitting, and my teenage daughter, who usually turns her nose up at anything remotely healthy, asked if we could make them again the next day.
What makes these cups so irresistible is how they capture everything you love about sushi without the intimidation factor. No special rolling skills required, no expensive sushi-grade fish from fancy markets, and definitely no judgmental sushi chefs watching your every move. Just cube some salmon, toss it with a few pantry staples, press everything into a muffin tin, and let your oven do the work. Thirty minutes later, you’ve got twelve perfect portions that work equally well as appetizers, lunch, or a light dinner. At around 180 calories per cup, they’re substantial enough to satisfy without leaving you stuffed. Ready to see how easy homemade sushi can be?
Why These Sushi Cups Work
Traditional sushi takes practice. Rolling mats, sticky fingers, rice flying everywhere. Been there, failed at that. Salmon Sushi Cups skip all the headaches while delivering the same delicious flavors. The muffin tin acts as your guide, creating perfectly portioned servings every single time. No measuring, no eyeballing, no wonky rolls that fall apart when you try to slice them.
Baking the salmon instead of serving it raw opens up this recipe to way more people. Not everyone feels comfortable eating raw fish, and honestly, finding truly sushi-grade salmon can be a challenge depending on where you live. The heat transforms the salmon into tender, flaky pieces with slightly crispy edges that contrast beautifully with the soft rice. The nori gets toasty and develops this almost chip-like texture that adds another dimension you don’t get with regular sushi rolls.
Another win is the make-ahead potential. Assemble these cups in the morning, cover them with plastic wrap, and keep them in the fridge until you’re ready to bake. They go straight from refrigerator to oven without any adjustment to cooking time. Perfect for meal prep on Sundays or when you’re hosting and don’t want to spend the whole party in the kitchen. I’ve made batches on Wednesday and baked them fresh on Friday night for guests. Works like a charm.
Ingredients You’ll Need
This recipe keeps things refreshingly simple. You probably already have half of these ingredients sitting in your pantry right now. The specialty items are easy to find at any Asian grocery store or even well-stocked regular supermarkets.
- 1 pound fresh salmon fillet, skinned and cut into small cubes
- 1 and 1/2 cups of uncooked sushi rice for the perfect sticky texture
- 1 tablespoon rice vinegar to season the rice
- 2 teaspoons of white sugar for balancing the vinegar
- 3 large nori sheets cut into squares to line the muffin cups
- 1 tablespoon light soy sauce for umami depth
- 1 tablespoon Kewpie mayo, creamy and slightly sweet
- 1 tablespoon sriracha for a spicy kick
- 1 teaspoon sesame oil for a nutty aroma
- Furikake seasoning for garnish and extra flavor
- 1 green onion sliced thin for a fresh finish
- Cooking spray to prevent sticking
Step-by-Step Instructions
Making Salmon Sushi Cups is surprisingly straightforward. Just follow these steps and you’ll have restaurant-quality results on your first attempt. Trust me, if I can do this on a chaotic Tuesday evening with kids running around, anyone can.
Start by cooking your sushi rice according to package directions. I use a rice cooker because it’s foolproof, but a regular pot works just fine if that’s what you have. While the rice cooks, grab a small microwave-safe bowl and combine your rice vinegar with the sugar. Zap it for about thirty seconds until the sugar dissolves completely. Once your rice finishes cooking, pour this mixture over the hot rice and fold it in gently. The warmth helps the rice absorb all that sweet-tangy goodness. Set this aside while you prep the salmon.
Preheat your oven to 400 degrees. Take your salmon fillet and pat it dry with paper towels. This step matters more than you’d think because excess moisture prevents proper browning. Cut the salmon into bite-sized cubes, keeping them roughly the same size so everything cooks evenly. Toss the cubed salmon in a bowl with soy sauce, Kewpie mayo, sriracha, and sesame oil. Mix until every piece gets coated in that creamy, spicy marinade. The mayo might seem weird but it keeps the salmon incredibly moist during baking.
Now for the assembly, which is honestly my favorite part. Take your nori sheets and cut each one into four equal squares. You should end up with twelve squares total, one for each muffin cup. Spray your muffin tin generously with cooking spray. This is not the time to be stingy because those cups need to pop out cleanly later. Place one nori square in each cup, pressing it down so it forms a little bowl shape.
Scoop a generous spoonful of your seasoned sushi rice onto each nori square. Use the back of the spoon or your fingers to press the rice down firmly, creating a compact base. Don’t be shy about really packing it in there. Loose rice falls apart when you try to remove the cups later. Aim for an even layer that covers the nori completely with maybe a quarter inch thickness.
Top each rice layer with a heaping spoonful of your salmon mixture. Again, press it down gently so everything holds together. The cups should look full but not overflowing. Slide the whole muffin tin into your preheated oven and bake for fifteen minutes. You’re looking for the salmon to cook through and the edges of the nori to get crispy and slightly golden. Some darker spots are totally fine and actually add great flavor.
Pull the tin out of the oven and let those cups cool for about five minutes. This resting time is crucial because piping hot cups crumble when you try to remove them. After cooling, use a butter knife to gently loosen the edges, then pop each cup out onto a serving platter. Drizzle with more sriracha or spicy mayo, sprinkle with furikake, scatter those sliced green onions on top, and serve immediately while they’re still warm.
Pro Tips for Success
Getting your Salmon Sushi Cups just right comes down to a few key tricks. First, use high-quality sushi rice if you can find it. Regular short-grain rice works in a pinch, but sushi rice has that perfect sticky texture that holds everything together. Rinse it thoroughly before cooking to remove excess starch. This prevents gummy, mushy rice that turns your cups into a sticky mess.
When pressing the rice into the muffin cups, really commit to it. I’m talking firm, even pressure that compacts the rice into a solid base. Loose rice creates structural problems later. Think of it like packing a snowball. You want it tight enough to hold its shape but not so aggressive that you’re crushing individual grains.
Don’t overcook the salmon. Fifteen minutes at 400 degrees should give you perfectly cooked fish that’s still moist and tender. If your oven runs hot, check at the twelve-minute mark. Overcooked salmon gets dry and chalky, ruining the whole experience. The fish should flake easily with a fork but still look slightly glossy, not bone dry.
Delicious Variations
Once you’ve mastered the basic Salmon Sushi Cups, the flavor possibilities expand dramatically. Swap the salmon for diced tuna if that’s more your style. Fresh ahi works beautifully and cooks in the same amount of time. Shrimp is another fantastic option. Use peeled and deveined raw shrimp, chop them into chunks, and toss with the same marinade.
Vegetarians can absolutely join the party. Replace the fish with cubed firm tofu or mix together diced cucumber, avocado, and shredded carrots. The baking time drops to about ten minutes since you’re just warming everything through and crisping the nori. I’ve also done a version with imitation crab stick that my kids absolutely devoured.
Play around with the sauce too. Instead of sriracha, try sweet chili sauce for a milder, sweeter kick. Spicy miso paste adds incredible depth. A drizzle of eel sauce on the finished cups brings that classic teriyaki sweetness. Sometimes I mix a little wasabi into the mayo for people who like their sushi with serious heat. Start with a tiny amount because wasabi packs a punch.
Troubleshooting Common Issues
If your cups stick to the pan, you didn’t use enough cooking spray. Nori wants to adhere to metal surfaces, so be generous with that spray. I’ve also had good luck lining each cup with a small piece of parchment paper before adding the nori. Creates a non-stick barrier that makes removal foolproof.
Cups falling apart when you remove them usually means the rice wasn’t pressed firmly enough or you tried to take them out while still too hot. Make sure to pack that rice down tight and give the cups adequate cooling time. Five minutes feels like forever when you’re hungry, but it makes all the difference.
Soggy nori happens when there’s too much moisture in your rice or salmon. Make sure to drain any excess liquid from your salmon marinade before adding it to the cups. Pat your cooked rice with a clean kitchen towel if it seems overly wet. The nori should crisp up nicely in the oven, but it can’t overcome swimming pools of liquid.
Ingredient Substitutions
Can’t find Kewpie mayo? Regular mayonnaise works fine, though you’ll miss out on that slightly sweeter, richer flavor that makes Kewpie special. If you want to get closer to the real thing, add a tiny pinch of sugar and a few drops of rice vinegar to regular mayo. Greek yogurt can replace mayo entirely for a lighter, tangier version with extra protein.
No sushi rice on hand? Short-grain white rice is your next best bet. It has enough natural stickiness to hold the cups together. Long-grain rice like basmati or jasmine won’t work because the grains stay too separate. Brown rice can work if you prefer whole grains, but it takes longer to cook and the texture will be chewier and less authentic.
Rice vinegar is fairly essential for that proper sushi flavor, but apple cider vinegar or white wine vinegar can substitute in a pinch. Use slightly less because they’re more acidic than rice vinegar. For the sriracha, any hot sauce you love will work. Sambal oelek, gochujang, or even a dash of cayenne mixed with ketchup can provide that spicy element.
Storage and Serving
Salmon Sushi Cups taste best fresh from the oven when the nori is still crispy and the salmon is warm and tender. That said, life happens and sometimes you need to make them ahead. Store baked cups in an airtight container in the refrigerator for up to two days. The nori will soften as it sits, losing that chip-like crunch, but the flavor remains delicious.
To reheat, pop them in a 350-degree oven for about ten minutes. This crisps up the nori again better than a microwave, though microwaving for 45 seconds works if you’re in a rush and don’t care about texture. I actually prefer eating leftover cups cold straight from the fridge. The flavors have had time to meld and it feels more like traditional sushi.
For serving, arrange the cups on a large platter with small bowls of extra soy sauce, wasabi, and pickled ginger on the side. Add some cucumber salad or a simple miso soup to round out the meal. These cups pair beautifully with edamame, seaweed salad, or even a crisp Asian slaw. For drinks, green tea is classic, but I also love them with a cold Japanese beer or sake.
Frequently Asked Questions
Can I use frozen salmon for this recipe?
Absolutely. Thaw it completely in the refrigerator overnight, then pat it very dry with paper towels before cubing. Frozen salmon often releases more moisture than fresh, so that drying step becomes even more important for preventing soggy cups.
Do I need a special muffin tin?
Any standard 12-cup muffin tin works perfectly. Non-stick makes removal easier, but regular metal tins work fine with enough cooking spray. Mini muffin tins create adorable bite-sized versions perfect for parties. Just reduce the baking time to about ten minutes.
Can I make these cups without baking?
You could assemble them with cooked salmon or even use sushi-grade raw salmon if you’re comfortable with that. Just skip the oven step entirely and serve immediately. The nori won’t get crispy, but you’ll have a more traditional sushi experience in cup form.
What if I don’t like spicy food?
Simply omit the sriracha from the salmon marinade. You can replace it with an extra tablespoon of mayo or add a teaspoon of honey for sweetness. The cups will still be delicious without any heat. Garnish with regular mayo instead of spicy mayo at the end.
How do I know when the salmon is cooked?
The salmon should look opaque throughout and flake easily when pressed with a fork. Internal temperature should reach 145 degrees if you want to be precise with a thermometer. The tops will have some golden-brown spots, and the edges might look slightly crispy.
Can I freeze Salmon Sushi Cups?
Freezing isn’t ideal because the rice texture suffers when thawed, becoming mushy and unpleasant. If you must freeze, do it before baking. Assemble the cups, freeze them on a baking sheet until solid, then transfer to a freezer bag. Bake from frozen, adding five extra minutes to the cooking time.
What can I use instead of furikake?
Toasted sesame seeds work great for garnish. You could also use everything bagel seasoning for a fun twist, or mix some toasted seaweed flakes with sesame seeds and a pinch of salt. Crushed nori sheets give you that seaweed flavor without needing to buy a separate seasoning.
Salmon Sushi Cups
Ingredients
Equipment
Method
- Cook the sushi rice according to package instructions. While rice cooks, combine rice vinegar and sugar in a microwave-safe bowl and microwave for 30 seconds until sugar dissolves.
- Pour the vinegar mixture over the cooked rice and fold it in gently. Set aside while you prepare the salmon.
- Preheat your oven to 400°F.
- Pat the salmon fillet dry with paper towels, then cut into bite-sized cubes. In a bowl, combine the cubed salmon with soy sauce, Kewpie mayo, sriracha, and sesame oil. Mix until well coated.
- Cut each nori sheet into 4 equal squares to make 12 squares total.
- Spray a 12-cup muffin tin generously with cooking spray. Place one nori square in each cup, pressing it down to form a bowl shape.
- Add a generous spoonful of seasoned sushi rice onto each nori square. Use the back of a spoon or your fingers to press the rice down firmly, creating a compact, even base.
- Top each rice layer with a heaping spoonful of the salmon mixture, pressing down gently so everything holds together.
- Bake in the preheated oven for 15 minutes, or until the salmon is cooked through and the edges of the nori are crispy and slightly golden.
- Remove from oven and let the cups cool for 5 minutes. Use a butter knife to gently loosen the edges, then pop each cup out onto a serving platter.
- Drizzle with more sriracha or spicy mayo, sprinkle with furikake, and scatter sliced green onions on top. Serve immediately while warm.
Notes
- Use high-quality sushi rice for the best sticky texture that holds the cups together.
- Press the rice firmly into the muffin tin so the cups maintain their shape when removed.
- Don’t overcook the salmon – aim for 12-15 minutes to keep it moist and tender.
- These cups can be assembled ahead and refrigerated, then baked when ready to serve.
- For a milder version, reduce or omit the sriracha in the salmon marinade.
- Substitute salmon with tuna, shrimp, or cubed tofu for variations.