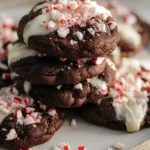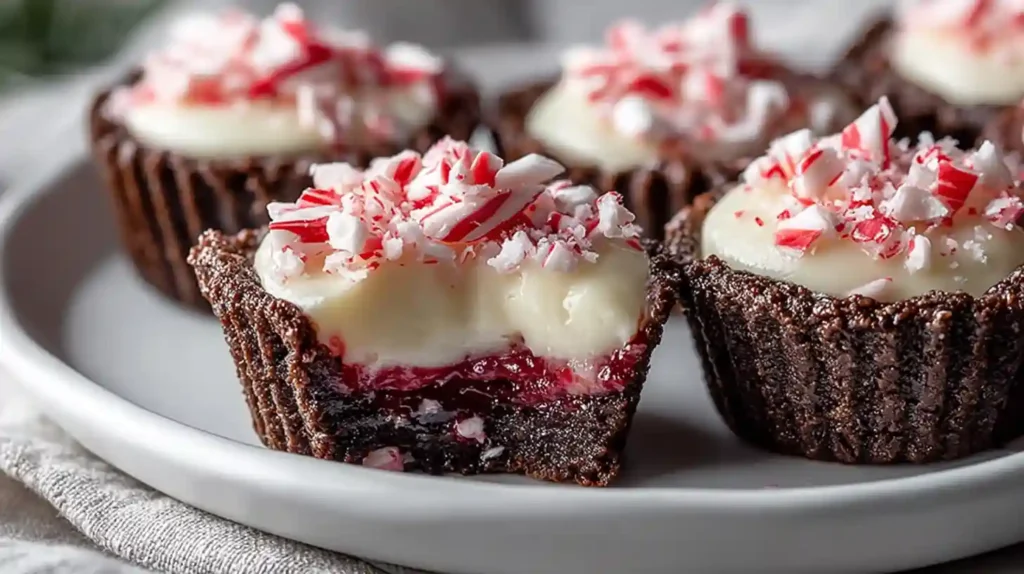
Last December my sister asked me to bring something special to our Christmas party. I wanted a dessert that looked impressive but would not keep me in the kitchen all day. These Chocolate Peppermint Cookie Cups with Cheesecake became the hit of the night. The rich chocolate cookie forms a perfect little cup that holds the most incredible peppermint cheesecake filling. Every bite gives you that classic holiday combination of chocolate and mint, plus the satisfying crunch of candy canes on top. People kept asking if I bought them from a fancy bakery. The truth is they only need about an hour from start to finish, and most of that time is hands-off chilling. If you want a dessert that tastes like the holidays and makes people think you spent all day baking, this recipe delivers exactly that.
Why This Recipe Works
The combination of Dutch-processed and black cocoa powder creates an intensely chocolatey cookie base with a gorgeous dark color that looks bakery-professional. These two cocoa powders work together to give you deep chocolate flavor without bitterness. The cookie stays soft in the center, which allows you to press a well into each one immediately after baking.
The peppermint cheesecake filling uses whipped cream folded into cream cheese, creating a mousse-like texture that feels luxurious but stays stable in the refrigerator. This no-bake filling sets up perfectly without gelatin or complicated techniques. The peppermint extract gives just enough mint flavor to complement the chocolate without overwhelming your taste buds.
Ingredients You Need
For the Chocolate Cookie Cups
- 2 cups all-purpose flour
- 1/4 cup Dutch-processed cocoa powder, sifted
- 1/4 cup black cocoa powder
- 1 teaspoon baking soda
- 1/2 teaspoon salt
- 1 cup unsalted butter, room temperature
- 1/2 cup granulated sugar
- 1 cup light brown sugar, packed
- 2 large eggs, room temperature
- 1 teaspoon vanilla extract
For the Peppermint Cheesecake Filling
- 1 cup heavy whipping cream, chilled
- 8 ounces cream cheese, full-fat
- 1/2 cup granulated sugar
- 1 teaspoon peppermint extract
- Red color gel for decoration (optional)
- Candy canes, chopped for garnish
How to Make Chocolate Peppermint Cookie Cups
Prepare the Cookie Cups
Preheat your oven to 350 degrees Fahrenheit and spray two regular-sized cupcake tins thoroughly with cooking spray. This step is essential because the cookies need to release easily after baking. In a medium bowl, whisk together the all-purpose flour, Dutch-processed cocoa powder, black cocoa powder, baking soda, and salt until no lumps remain.
In a large mixing bowl, beat the room temperature unsalted butter with both sugars on medium-high speed for 2 to 3 minutes until the mixture becomes light, fluffy, and noticeably paler in color. Reduce the mixer speed to low and add the eggs one at a time, making sure each one fully incorporates before adding the next. Beat in the vanilla extract, then gradually add the flour mixture and mix only until just combined to avoid tough cookies.
Bake and Shape
Using a large cookie scoop or approximately 3 tablespoons of dough, portion the cookie dough evenly into the prepared muffin tins. You should get about 20 cookie cups from this recipe. Bake for 10 to 13 minutes until the cookies are mostly set but still slightly soft in the centers. Do not overbake or the cookies will be too firm to shape.
The moment the cookies come out of the oven, grab a small jar or round container and press down firmly into the center of each warm cookie to create a well for the filling. Work quickly while the cookies are still hot and pliable. Let the cookie cups cool in the pans for 10 minutes, then gently twist each cup slightly to loosen them from the tin. Continue cooling for an additional 5 minutes before transferring to a wire rack to cool completely.
Make the Peppermint Cheesecake Filling
While the cookie cups cool, prepare the filling. Using a cold bowl and cold whisk attachment, whip the chilled heavy cream on high speed until stiff peaks form. This usually takes 3 to 4 minutes with a stand mixer. In a separate mixing bowl, beat the full-fat cream cheese, granulated sugar, and peppermint extract together until the mixture is completely smooth and creamy with no lumps.
Gently fold the whipped cream into the cream cheese mixture using a rubber spatula, making sure to maintain as much air as possible. The filling should be light, fluffy, and perfectly smooth. For a festive presentation, use a small food-safe paintbrush to paint two decorative red stripes on the inside of a piping bag fitted with a large round tip before filling it with the peppermint cheesecake mixture.
Assemble and Chill
Pipe a generous swirl of the peppermint cheesecake filling into each cooled cookie cup, filling them right to the top. If you painted red stripes in your piping bag, you will see charming red streaks appear as you pipe. Refrigerate the filled cookie cups for 1 to 2 hours until the filling sets completely. Just before serving, sprinkle chopped candy canes generously on top of each cup for that signature peppermint bark look and satisfying crunch.

Pro Tips for Perfect Cookie Cups
- Bring butter and eggs to true room temperature before starting. Cold ingredients prevent proper creaming and create dense cookies.
- Sift the Dutch-processed cocoa powder to remove lumps that can create dry spots in your cookie dough.
- Use a chilled bowl and whisk for whipping cream. This helps the cream whip faster and achieve better volume.
- Press the wells into cookies immediately after baking while they are still hot and pliable. Waiting even 30 seconds makes shaping difficult.
- Do not skip the cooling time in the pan. This helps the cookie cups set their shape properly.
- Fold the whipped cream gently to maintain the airy texture that makes the filling so light.
- Add candy cane topping just before serving to keep it crunchy. The moisture from the filling will soften it over time.
Ingredient Substitutions
- No black cocoa powder: Use all Dutch-processed cocoa powder for a lighter color but still rich chocolate flavor.
- No Dutch-processed cocoa: Regular cocoa powder works but gives a slightly less intense chocolate taste.
- Gluten-free option: Replace all-purpose flour with a 1-to-1 gluten-free baking flour blend that contains xanthan gum.
- Different extract: Try vanilla extract in the filling instead of peppermint for a classic cheesecake flavor.
- Dairy-free: Use vegan butter and vegan cream cheese with coconut cream instead of heavy cream.
- No candy canes: Substitute with crushed peppermint candies, mini chocolate chips, or leave plain.
Serving Suggestions
Garnish Ideas
Beyond chopped candy canes, these Chocolate Peppermint Cookie Cups with Cheesecake shine with additional garnishes. Dust lightly with cocoa powder or powdered sugar for elegant presentation. Drizzle melted dark chocolate over the top in thin lines for a professional bakery look. Add mini chocolate chips around the edge of the filling for extra chocolate flavor. A small mint leaf pressed into the filling makes a beautiful natural garnish for holiday parties.
Pairing Suggestions
Serve these cookie cups alongside peppermint hot chocolate that echoes the mint flavors. A simple cup of coffee or espresso balances the sweetness beautifully. For a dessert platter, arrange them with other holiday treats like brownies, fudge, and shortbread cookies. A scoop of vanilla ice cream on the side provides creamy contrast to the rich chocolate and refreshing mint.
Presentation Ideas
Arrange the cookie cups on a festive platter lined with crushed candy canes or fresh mint leaves for beautiful color contrast. Place them in clear glass jars layered with holiday sprinkles for a whimsical treat station at parties. For gifting, pack them in decorative boxes with parchment paper between layers and tie with a ribbon. The individual cup shape makes them perfect for holiday dessert tables where guests can grab one easily.
Storage and Make-Ahead Tips
Storing Leftovers
Store Chocolate Peppermint Cookie Cups with Cheesecake in an airtight container in the refrigerator. The cheesecake filling needs to stay cold to maintain its texture and food safety. They will keep fresh and delicious for 2 to 3 days when properly stored. Arrange them in a single layer or separate layers with parchment paper to prevent the candy cane topping from sticking.
Freezing Instructions
Freeze these cookie cups without the candy cane garnish for best results. Place them on a baking sheet in a single layer and freeze until solid, about 2 hours. Transfer the frozen cookie cups to a freezer-safe container or bag with parchment paper between layers. They keep well for up to 4 weeks frozen. Thaw overnight in the refrigerator, then add fresh candy cane topping just before serving.
Make-Ahead Strategy
Bake and shape the cookie cups up to 2 days ahead of time. Store them in an airtight container at room temperature. Make the peppermint cheesecake filling the day before and keep it refrigerated in the piping bag. Pipe the filling into the cookie cups and refrigerate for at least 1 hour before your party. Add the candy cane topping within an hour of serving for maximum crunch.
Troubleshooting Common Problems
- Cookies cracking when shaping: They overbaked or cooled too much. Press wells immediately after removing from oven while still very hot.
- Cookies sticking to pan: Use more cooking spray and make sure to twist cookies gently after 10 minutes of cooling.
- Filling too soft: Whip cream to true stiff peaks and make sure cream cheese is not too warm. Refrigerate longer to set.
- Filling too thick: Fold whipped cream more gently to maintain air, or add 1 tablespoon of cream to loosen.
- Cookies spreading too much: Make sure butter is at cool room temperature, not melted or too soft.
- Not enough chocolate flavor: Use high-quality cocoa powder and make sure both types are unsweetened.
Recipe Variations
- Double chocolate: Add 1/2 cup mini chocolate chips to the cookie dough for extra chocolate throughout.
- Mint chocolate chip: Fold 1/4 cup finely chopped chocolate into the cheesecake filling.
- Vanilla version: Skip peppermint extract and use 2 teaspoons vanilla extract in the filling instead.
- Mocha cups: Add 1 tablespoon instant espresso powder to the cookie dough for coffee flavor.
- Salted caramel: Drizzle salted caramel sauce over the cheesecake filling before adding candy cane topping.
- White chocolate: Replace dark cocoa with regular cocoa and add white chocolate chips to the dough.
Frequently Asked Questions
Can I use regular cocoa powder instead of black cocoa?
Yes, you can substitute regular Dutch-processed cocoa powder for the black cocoa powder. The cookies will be lighter in color and have slightly less intense chocolate flavor, but they will still taste delicious. Black cocoa gives that signature Oreo-like darkness and depth.
Can I make the filling without heavy cream?
The whipped heavy cream creates the light, mousse-like texture that makes this filling special. Without it, the filling becomes dense and thick. For an alternative, try folding in whipped cold Greek yogurt, though the taste and texture will differ from the original recipe.
How do I prevent the cookie cups from cracking?
Do not overbake the cookies. Pull them out when they are set but still soft in the center. Press the wells immediately while the cookies are hot and pliable. Working quickly and pressing firmly but gently helps create perfect wells without cracks.
Can I prepare these cookie cups ahead for a party?
Absolutely. Bake and shape the cookie cups up to 2 days ahead and store at room temperature. Fill them with the cheesecake mixture and refrigerate for at least 1 hour before serving. Add candy cane topping just before your guests arrive to keep it crunchy.
What if I do not have a piping bag?
Use a spoon to dollop the filling into each cookie cup, then use the back of the spoon to create a swirl pattern. You can also fill a zip-top bag with the filling, cut off a corner, and pipe that way. The presentation will not be quite as elegant but the taste remains perfect.
Why is my cheesecake filling runny?
Make sure you whip the cream to true stiff peaks before folding it into the cream cheese mixture. Also verify your cream cheese is cold but not overly soft. The filling firms up significantly in the refrigerator, so give it the full 1 to 2 hours of chilling time.
Can I make these gluten-free?
Yes, substitute the all-purpose flour with a 1-to-1 gluten-free baking flour blend designed for cookies. Make sure the blend contains xanthan gum or another binder to help the cookie structure. The texture may differ slightly but the cookies will retain their festive flavor.

Chocolate Peppermint Cookie Cups with Cheesecake
Ingredients
Equipment
Method
- Preheat and Prepare Tins: Preheat oven to 350°F (175°C). Spray two regular-sized cupcake tins thoroughly with cooking spray to prevent sticking.
- Mix Dry Ingredients: In a medium bowl, whisk together all-purpose flour, Dutch-processed cocoa powder, black cocoa powder, baking soda, and salt. Set aside.
- Cream Butter and Sugars: In a large mixing bowl, beat unsalted butter, granulated sugar, and light brown sugar on medium-high speed until light, fluffy, and well combined, about 2 to 3 minutes.
- Add Eggs and Vanilla: Reduce mixer speed to low. Add eggs one at a time, followed by vanilla extract. Beat until fully incorporated.
- Combine Wet and Dry: Gradually add the flour mixture to the butter mixture and mix only until just combined. Do not overmix.
- Scoop and Bake: Using a large cookie scoop or approximately 3 tablespoons, portion cookie dough evenly into prepared muffin tins. Bake for 10 to 13 minutes or until mostly set but still soft in the centers.
- Create Wells: Immediately after removing from oven, press down firmly into the center of each cookie cup using a small jar or container to create a well for filling. Work quickly while cookies are hot.
- Cool Cookies: Allow cookie cups to cool in pans for 10 minutes. Gently twist each cup slightly to loosen, continue cooling for 5 more minutes, then transfer to a wire rack to cool completely.
- Whip Cream: Using a cold bowl and whisk, whip chilled heavy cream until stiff peaks form, about 3-4 minutes.
- Mix Cheesecake Base: In a separate mixing bowl, beat cream cheese, granulated sugar, and peppermint extract together until smooth and creamy with no lumps.
- Fold in Whipped Cream: Gently fold the whipped cream into the cream cheese mixture until fully combined and smooth, maintaining as much air as possible.
- Prepare Piping Bag (Optional): Using a small food-safe paintbrush, paint two decorative red stripes on the inside of a piping bag fitted with a large round tip. Fill piping bag carefully with peppermint cheesecake filling.
- Fill Cookie Cups: Pipe a generous swirl of cheesecake filling into each cooled cookie cup, filling right to the top.
- Chill to Set: Refrigerate filled cookie cups for 1 to 2 hours or until the filling is completely set.
- Garnish and Serve: Sprinkle chopped candy canes on top of chilled cookie cups just before serving. Keep refrigerated and consume within 2 to 3 days.
Notes
- Room temperature eggs and butter help create a smoother cookie dough and better texture.
- Use a cold bowl and whisk for whipping cream to achieve better volume and stability.
- Black cocoa powder enhances the depth of chocolate flavor and gives an intense dark color. Can substitute with regular Dutch-processed cocoa.
- Press wells immediately while cookies are still hot and pliable. Waiting makes shaping difficult.
- Store leftover cookie cups in an airtight container in the refrigerator for 2-3 days.
- Freeze without candy cane garnish for up to 4 weeks. Add fresh topping after thawing.
- Add candy cane topping just before serving to maintain crunch and prevent softening.