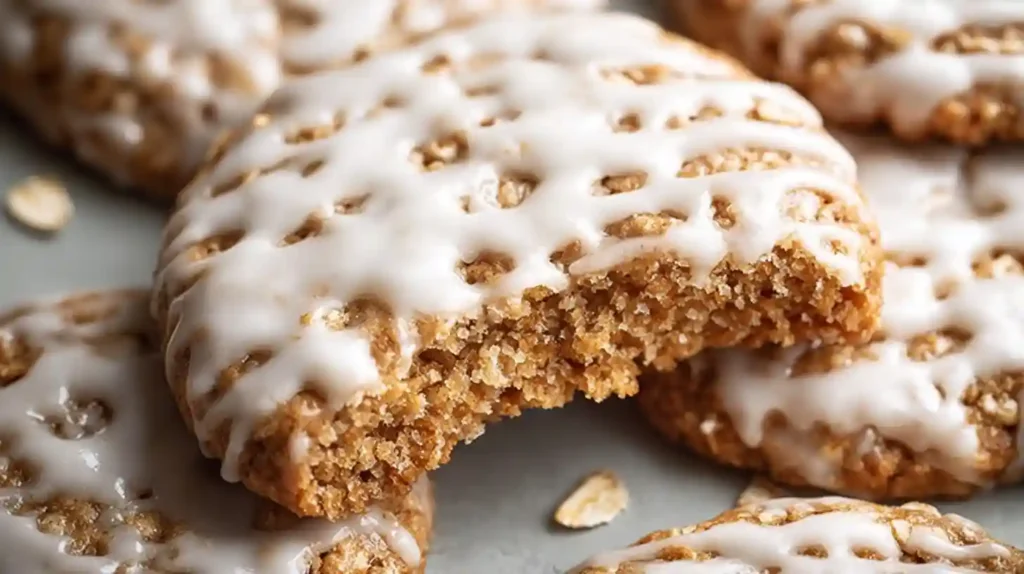
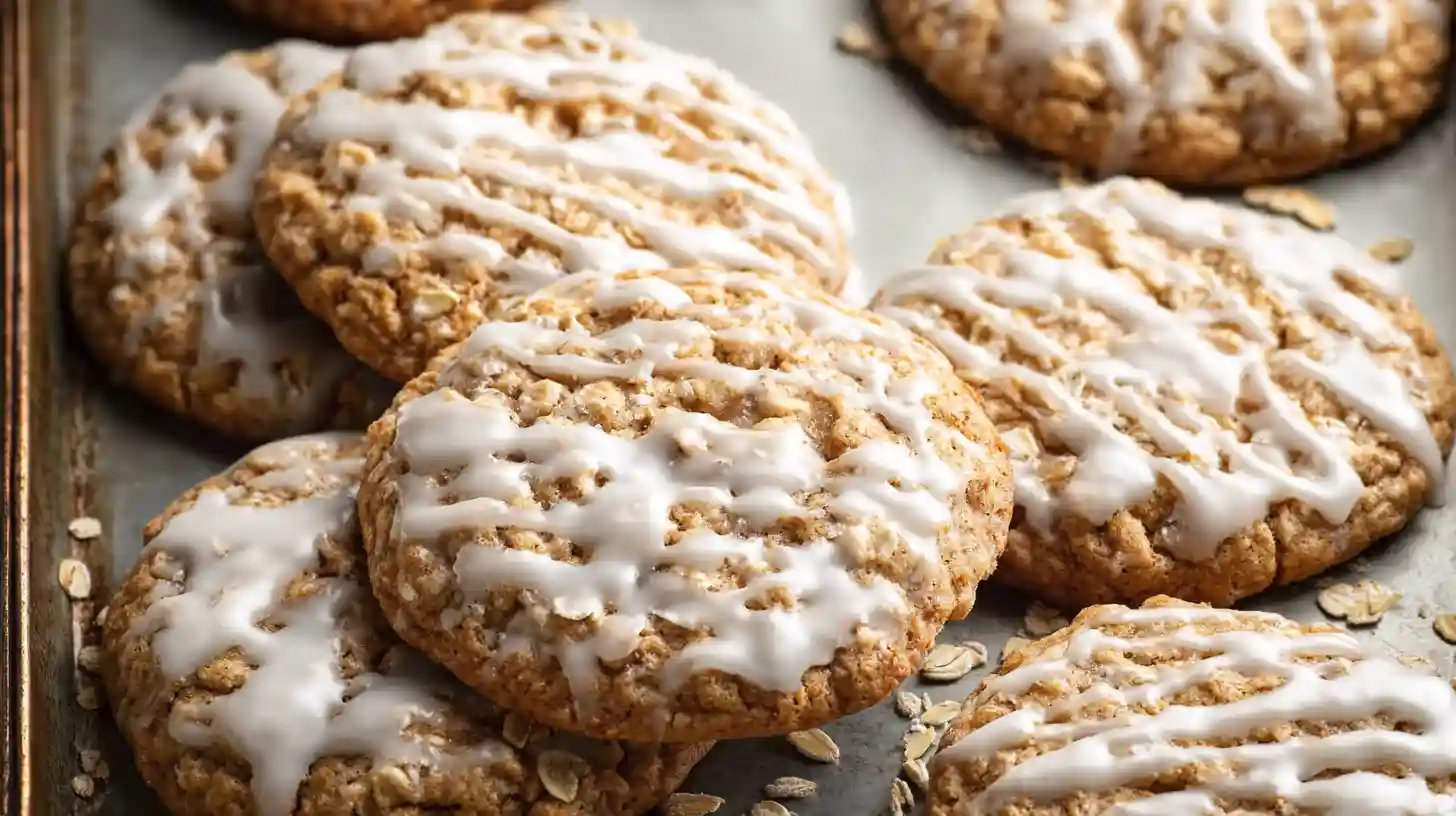
My grandmother kept a blue tin of store-bought iced oatmeal cookies in her pantry. The kind with the white glaze that cracked when you bit into it. Every time we visited, she would pull out that tin and I would grab three or four cookies, dunking them in cold milk until they got soft. Those cookies were good, but they were also a little dry and the icing tasted more like sugar than anything else. Years later, when I started baking seriously, I wanted to recreate that childhood memory but make it actually taste as good as I remembered it feeling. That is when I discovered brown butter. The first time I browned butter for cookies, I understood why pastry chefs talk about it with such reverence. It smells like toasted nuts and caramel. It adds this depth that regular melted butter just cannot match. When I combined brown butter with oats, molasses, warm spices, and a proper vanilla glaze, I finally had what I had been chasing. These Brown Butter Iced Oatmeal Cookies are everything those store-bought ones wanted to be. Soft centers. Chewy, crackly edges. A glaze that actually tastes like vanilla instead of just sweetness. They are the platonic ideal of an iced oatmeal cookie, and once you make them, you will never go back to the tin.
What Makes These Cookies Special
The brown butter is the secret weapon here. When you brown butter, you cook it past the melting point until the milk solids turn golden and release a nutty, almost toffee-like aroma. This happens through a process called the Maillard reaction, the same chemistry that makes toast taste better than bread. That nutty flavor infuses the entire cookie and elevates what could be a simple oatmeal cookie into something memorable. Without it, these would still be good. With it, they are extraordinary.
The texture comes from pulsing the oats before adding them to the dough. This creates a mix of fine oat flour and larger oat pieces. The flour integrates smoothly into the dough, while the larger pieces create those characteristic crackly, craggy tops that make these cookies look homemade and rustic. The combination of granulated sugar and molasses provides both sweetness and moisture, keeping the cookies soft even after they cool. The vanilla glaze is thick enough to set properly but not so thick that it cracks and falls off when you bite into the cookie. Everything works together to create a cookie that stays soft for days.
Gathering Your Ingredients
For the cookies, you need one cup of unsalted butter. Use real butter, not margarine or spreads. The browning process depends on the milk solids in butter, which those substitutes do not have. One cup of granulated sugar provides sweetness. Two large eggs bind everything together and add richness. Two teaspoons of vanilla extract enhance all the other flavors. Two tablespoons of molasses add moisture and a subtle depth. Do not use blackstrap molasses, which is too bitter. Regular or mild molasses works best.
For the dry ingredients, you need one and three-quarters cups of all-purpose flour. Two cups of old-fashioned oats, which you will pulse in a food processor. One teaspoon of baking soda helps the cookies spread and creates that chewy texture. One and a half teaspoons of ground cinnamon and half a teaspoon of ground nutmeg provide warm spice flavor. Three-quarters teaspoon of salt balances the sweetness. For the vanilla glaze, you need two cups of powdered sugar, two tablespoons of milk, and one teaspoon of vanilla extract. The glaze comes together in seconds and should be thick enough to coat a spoon but thin enough to drip slowly.
Browning the Butter
Cut the butter into tablespoon-sized pieces so it melts evenly. Place it in a light-colored saucepan over medium heat. A light-colored pan is important because it lets you see when the milk solids start to brown. In a dark pan, you cannot see the color change and you risk burning the butter. Melt the butter completely, then continue cooking. It will foam and bubble vigorously as the water evaporates. Keep stirring and watching.
After about five to seven minutes, the butter will calm down and you will start to see brown specks forming at the bottom of the pan. These are the milk solids caramelizing. The butter will smell nutty and toasted, like caramel popcorn. As soon as it reaches this point, immediately pour it into a heatproof bowl. If you leave it in the hot pan, it will continue cooking and can burn. Let the browned butter cool for twenty minutes before using it. It needs to be warm but not hot, or it will cook the eggs when you mix them in.
Making the Cookie Dough
While the butter cools, prepare the oats. Add two cups of old-fashioned oats to a food processor. Pulse ten to fifteen times until you have a mixture of fine crumbs and larger oat pieces. Do not process it into complete flour. You want texture. If you do not have a food processor, you can use a blender, working in batches. In a separate bowl, whisk together the flour, baking soda, cinnamon, nutmeg, and salt. Set both aside.
Once the butter has cooled for twenty minutes, add the granulated sugar to it. Use a whisk and mix vigorously for a full minute. The mixture should become thick and paste-like, pulling away from the sides of the bowl when you stir. This step aerates the dough and creates a lighter texture. Add the eggs and vanilla extract, whisking until smooth and fully incorporated. The mixture will look glossy. Add the molasses and stir until no streaks remain.
Add the flour mixture to the wet ingredients. Switch from a whisk to a large spatula. Fold everything together gently just until you stop seeing streaks of flour. Do not overmix or the cookies will be tough. Add the pulsed oats and fold again until evenly distributed. The dough will be thick and look more like cake batter than typical cookie dough. This is correct.
Chilling and Baking
Line a baking sheet with parchment paper. Using a cookie scoop or spoon, portion the dough into equal-sized balls. I use a kitchen scale and weigh each portion at about two tablespoons or forty grams for perfectly uniform cookies. Place the dough balls on the prepared baking sheet, leaving space between them. Cover the entire sheet with plastic wrap and refrigerate for at least three hours. Overnight is even better. This chilling time is not optional. It allows the flour to fully hydrate and gives the butter time to solidify, which prevents the cookies from spreading too much when they bake.
When you are ready to bake, preheat your oven to 350 degrees Fahrenheit. Take the chilled dough balls straight from the refrigerator to the oven. Do not let them come to room temperature. Bake one sheet at a time on the center rack for nine to ten minutes. Start checking at the eight-minute mark. The edges should be set and beginning to brown. The centers will look puffy and slightly underdone. This is exactly what you want. The cookies will continue baking as they cool, and they will deflate slightly.
Remove the cookies from the oven and let them cool on the baking sheet for five to ten minutes. They will be too soft to move immediately. After they have set slightly, carefully transfer them to a wire rack using a thin spatula. Let them cool completely to room temperature before glazing. This takes at least an hour. If you try to glaze warm cookies, the icing will melt into the cookie instead of setting on top.
Making and Applying the Glaze
In a medium bowl, whisk together the powdered sugar, milk, and vanilla extract. Start with two tablespoons of milk and add more if needed. The consistency should be thick enough that when you lift the whisk, the glaze slowly drips back into the bowl. If it is too thin, add more powdered sugar a tablespoon at a time. If it is too thick, add milk by the teaspoon.
Pour the glaze into a shallow bowl or plate. Take a completely cooled cookie and dunk just the top into the glaze. Do not submerge the whole cookie. Press down gently until you meet a little resistance from the glaze. Lift the cookie straight up and let the excess glaze drip off for a few seconds. Flip the cookie right-side up and place it back on the wire rack. The glaze will settle into all the cracks and crevices on top of the cookie, creating that signature look. Repeat with the remaining cookies. Let them sit undisturbed for about two hours until the glaze fully sets. It will dry to a smooth, matte finish that will not be sticky to the touch.
Tips for Perfect Cookies
- Pulse the oats to create texture. This is what gives the cookies their crackly tops.
- Do not overbake. The centers should look slightly underdone when you pull them from the oven.
- Cool the cookies completely before glazing or the icing will melt instead of setting.
- Chill the dough for at least three hours. This step prevents spreading and improves texture.
- Use a kitchen scale to portion the dough for uniform cookies that bake evenly.
Common Mistakes to Avoid
The most common mistake is burning the butter. Brown butter and burned butter are separated by about thirty seconds. Once the milk solids start to brown, things happen fast. Watch the pan constantly and smell the butter. The moment it smells nutty and toasted, pour it out of the pan. If it smells acrid or burnt, you have gone too far and need to start over. Another mistake is not cooling the browned butter enough before adding the eggs. Hot butter will scramble the eggs and ruin the dough texture.
Many people skip the chilling step or do not chill the dough long enough. This results in cookies that spread too thin and lose their soft, chewy texture. The dough needs at least three hours, preferably overnight. Overbaking is another common issue. These cookies should come out of the oven when the centers still look slightly underbaked. They firm up as they cool. If you bake until they look completely done, they will be dry and hard once they cool. Finally, glazing warm cookies will cause the icing to melt into the cookie instead of setting on top, eliminating that pretty iced appearance.
Variations to Try
For a gingerbread version, adjust the spices. Use one and a half teaspoons of ground cinnamon, one teaspoon of ground ginger, one-quarter teaspoon of ground nutmeg, and one-quarter teaspoon of ground cloves. Top with a cinnamon-dusted glaze or a brown sugar maple glaze for an extra festive touch. You can also add raisins or dried cranberries to the dough for a fruitier cookie. Fold in three-quarters cup of raisins or chopped dried cranberries after adding the oats.
For chocolate chip iced oatmeal cookies, fold one cup of mini chocolate chips into the dough along with the oats[file:32]. The chocolate pairs beautifully with the brown butter and spices. You can also make these into sandwich cookies. Skip the glaze and sandwich two cookies together with cream cheese frosting or buttercream. The cookies freeze well unfrosted, so you can bake a double batch and freeze half for later.
Storing and Freezing
Store the glazed cookies in an airtight container at room temperature for up to six days. They actually taste better on the second and third day once the glaze has settled into all the nooks and crannies. Layer them with parchment paper between each layer to prevent sticking. The cookies stay soft because of the molasses and the proper baking time. They will not dry out like store-bought versions.
To freeze the cookies, you can freeze them before or after glazing. If glazing first, let the cookies sit at room temperature until the glaze fully sets, about two hours. Wrap each cookie individually in plastic wrap, then place them all in a large freezer bag or airtight container. They will keep for up to three months. Thaw at room temperature for about an hour before serving. You can also freeze the unbaked cookie dough balls. Scoop the dough, freeze the balls on a baking sheet until solid, then transfer to a freezer bag. Bake from frozen, adding one to two minutes to the baking time.
Why This Recipe Works
This recipe works because every element serves a specific purpose. The brown butter provides depth of flavor that plain butter cannot match. Pulsing the oats creates texture without making the cookies gritty. The molasses adds moisture and helps the cookies stay soft for days. The combination of baking soda and the proper amount of sugar creates cookies that spread just enough but maintain a thick, chewy texture. Chilling the dough allows the flour to fully hydrate and prevents excessive spreading during baking.
The glaze is formulated to set properly without being too hard or too soft. The ratio of powdered sugar to liquid creates a coating that dries to a smooth finish but still has a slight give when you bite into it. The vanilla extract in the glaze adds actual flavor instead of just sweetness. Every detail has been tested and refined to create a cookie that tastes homemade, looks beautiful, and stays fresh longer than typical cookies. Make these once and they will become your new standard for iced oatmeal cookies.
Frequently Asked Questions
Can I skip the brown butter?
You can, but the cookies will not have the same depth of flavor. Brown butter is what sets these apart from regular oatmeal cookies. If you have never browned butter before, this is a great recipe to try it with. The process is simpler than it sounds and the flavor difference is dramatic.
Why do I need to chill the dough?
Chilling solidifies the fat and allows the flour to fully hydrate. This prevents the cookies from spreading too much during baking and creates a better texture. The cookies need at least three hours of chilling, but overnight is ideal. This is one step you cannot skip.
Can I use quick oats instead of old-fashioned oats?
No, you need old-fashioned rolled oats. Quick oats are too finely cut and will absorb liquid differently, resulting in mushy cookies without the proper texture. Old-fashioned oats create those characteristic crackly tops that make these cookies look homemade.
Why are my cookies spreading too much?
If your cookies spread too much, you either did not chill the dough long enough or your oven temperature is too low. Make sure the dough chills for at least three hours. Use an oven thermometer to verify your oven temperature is accurate. Bake the cookies straight from the refrigerator without letting them come to room temperature.
Can I make these gluten-free?
You can try using a one-to-one gluten-free flour blend in place of the all-purpose flour. The texture may be slightly different, but several people have reported good results with this substitution. Make sure your gluten-free blend contains xanthan gum or another binder.
The glaze is too thin. How do I fix it?
Add more powdered sugar, one tablespoon at a time, until the glaze thickens to the right consistency. It should be thick enough that when you lift the whisk, the glaze slowly drips back into the bowl. If it runs off immediately, it is too thin.
How long do these cookies stay fresh?
Stored in an airtight container at room temperature, these cookies stay fresh for up to six days. They actually taste better on the second and third day once the glaze has settled into the cookie. They do not dry out like most cookies because of the molasses and proper baking technique.
Brown Butter Iced Oatmeal Cookies
Ingredients
Equipment
Method
- Brown the Butter: Cut butter into pieces and melt in a light-colored saucepan over medium heat. Continue cooking, stirring frequently, until milk solids turn golden brown and butter smells nutty, 5 to 7 minutes. Immediately pour into a heatproof bowl and cool for 20 minutes.
- Pulse Oats: Add oats to food processor and pulse 10 to 15 times until you have a mixture of fine crumbs and larger oat pieces. Set aside.
- Mix Dry Ingredients: In a bowl, whisk together flour, baking soda, cinnamon, nutmeg, and salt. Set aside.
- Mix Wet Ingredients: Add sugar to cooled brown butter and whisk vigorously for 1 minute until thick and paste-like. Add eggs and vanilla, whisking until smooth. Add molasses and stir until no streaks remain.
- Combine: Add flour mixture to wet ingredients and fold gently with spatula just until combined. Add pulsed oats and fold until evenly distributed. Do not overmix.
- Chill Dough: Scoop dough into equal-sized balls (about 2 tablespoons each) and place on parchment-lined baking sheet. Cover with plastic wrap and refrigerate for at least 3 hours or overnight.
- Bake: Preheat oven to 350°F (175°C). Bake chilled cookies one sheet at a time on center rack for 9 to 10 minutes. Edges should be set and centers slightly underdone. Cool on baking sheet for 5 to 10 minutes, then transfer to wire rack to cool completely.
- Make Glaze: Whisk together powdered sugar, 2 tablespoons milk, and vanilla extract until smooth. Glaze should be thick enough to slowly drip from whisk. Add more milk or sugar to adjust consistency.
- Glaze Cookies: Pour glaze into shallow bowl. Dunk top of each completely cooled cookie into glaze, let excess drip off, and place on wire rack right-side up. Let sit for 2 hours until glaze fully sets.