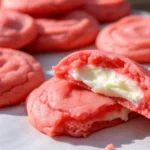
Last Valentine’s Day, I promised my partner something special from scratch instead of store-bought chocolates. After three failed attempts at fancy desserts, I discovered this heart shaped brownies recipe that changed everything. The first batch disappeared in twenty-four hours, and I’ve been making them for every romantic occasion since.
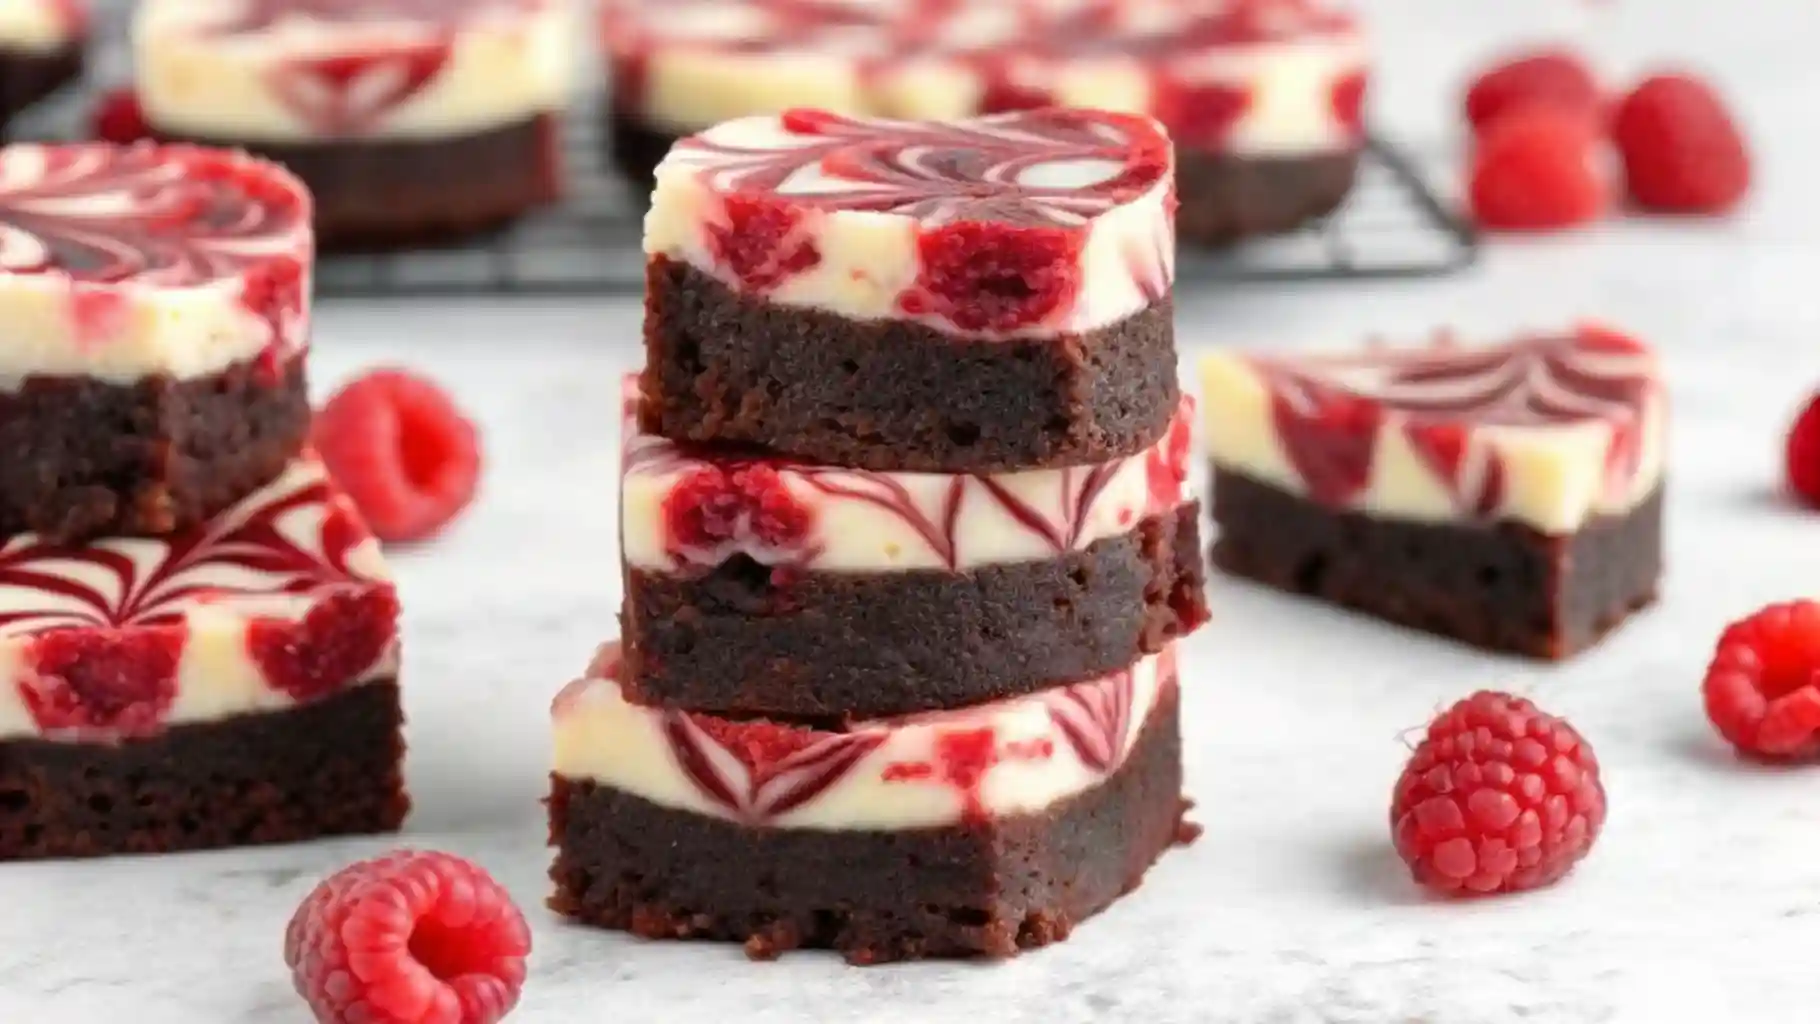
These brownies combine rich fudgy chocolate with tangy cream cheese and bright raspberry swirl. The contrast between the dense brownie base and silky cheesecake topping creates an irresistible texture. Cutting them into hearts transforms a simple dessert into a thoughtful gesture that looks bakery-professional.
The secret lies in proper layering and chilling. The raspberry sauce gets strained for smoothness, the cheesecake layer stays creamy without overbaking, and two hours in the refrigerator ensures clean cuts. This recipe requires minimal special equipment beyond a heart-shaped cookie cutter.
Why This Recipe Works
Most brownie recipes either turn out cakey or too gooey. This version uses Dutch-process cocoa and oil instead of butter for pure chocolate flavor without heaviness. The oil creates that signature fudgy texture while keeping the brownies moist for days.
The cheesecake layer provides tangy richness that cuts through the chocolate intensity. Room temperature cream cheese mixes smoothly without lumps, creating a silky topping that bakes to perfection without cracking. The minimal egg content keeps it stable during baking.
Homemade raspberry sauce delivers better flavor than jam. Simmering fresh or frozen raspberries concentrates their natural tartness while sugar balances the acidity. Straining removes seeds for an elegant finish that swirls beautifully through the cheesecake.
Essential Ingredients
Quality ingredients elevate these brownies from good to extraordinary. Use the best cocoa powder you can afford for intense chocolate flavor.
For the Raspberry Sauce
- 1 cup fresh or frozen raspberries
- 1 tablespoon granulated sugar
- 1 teaspoon vanilla extract
For the Cheesecake Layer
- 8 ounces cream cheese, room temperature
- ⅓ cup granulated sugar
- 1 large egg, room temperature
- ½ teaspoon vanilla extract
For the Brownie Base
- 1 cup all-purpose flour
- ¾ cup Dutch-process cocoa powder, sifted
- ¼ teaspoon salt
- ¾ cup plus 2 tablespoons refined coconut oil or neutral vegetable oil
- 1½ cups granulated sugar
- 1 tablespoon vanilla extract
- 3 large eggs, room temperature
Dutch-process cocoa creates deeper chocolate flavor than natural cocoa. The alkalizing process mellows acidity and darkens the color. If you only have natural cocoa, it works but produces lighter, slightly more acidic brownies.
Refined coconut oil adds richness without coconut flavor. Virgin coconut oil will give a slight coconut taste that some people love. Vegetable, canola, or melted butter all work as substitutes.
Room temperature ingredients blend more smoothly. Cold cream cheese creates lumps no matter how much you beat it. Let ingredients sit on the counter for an hour before starting.
Making the Raspberry Sauce
Combine raspberries, sugar, and vanilla in a small saucepan over medium heat. Stir occasionally as the berries break down and release their juice. The mixture should reach a gentle simmer within two to three minutes.
Continue simmering for five to eight minutes until the sauce thickens enough to coat the back of a spoon. When you draw a line through the coating with your finger, it should hold for a second before dripping. This consistency swirls beautifully without sinking.
Pour the mixture through a fine-mesh strainer set over a bowl. Press the berries with the back of a spoon to extract all the liquid and pulp. Discard the seeds. You should have about one-third cup of smooth, glossy sauce.
Let the sauce cool to room temperature before using. Hot sauce can cause the cheesecake layer to melt or create uneven swirls. Make this component first so it has time to cool while you prepare other elements.
Preparing the Cheesecake Topping
Beat the softened cream cheese with an electric mixer on medium speed for one minute until creamy. Scrape down the bowl to ensure no lumps hide at the bottom. The cream cheese should be completely smooth before adding other ingredients.
Add the sugar and beat for another minute until fully incorporated. The mixture will lighten slightly in color and become fluffier. This aeration helps create a tender cheesecake layer that doesn’t sink into the brownies.
Add the egg and vanilla extract. Beat on low speed just until combined. Overbeating after adding the egg incorporates too much air, which can cause cracks during baking. The mixture should be silky and pourable but not airy.
Mixing the Brownie Batter
Whisk together the flour, cocoa powder, and salt in a medium bowl. Sift the cocoa if it has lumps. Break up any flour clumps with the whisk. Set this aside while you prepare the wet ingredients.
In a large bowl, whisk the oil, sugar, and vanilla until combined. The mixture will look grainy since sugar doesn’t dissolve in oil. Add the eggs one at a time, whisking vigorously after each addition until the mixture becomes glossy and emulsified.
Pour the dry ingredients into the wet ingredients. Fold gently with a rubber spatula just until no dry streaks remain. A few small lumps are fine. Overmixing develops gluten that makes brownies tough and cakey instead of fudgy.
The batter should be thick, glossy, and pourable. If it seems too thick, it will still work perfectly. Don’t add extra liquid. The eggs provide enough moisture for rich, fudgy brownies.
Assembly and Baking
Preheat your oven to 350°F. Line an eight-inch square baking pan with parchment paper, leaving overhang on two sides. This creates handles for lifting the brownies out after chilling.
Pour the brownie batter into the prepared pan and spread it evenly with a spatula. Tap the pan on the counter a few times to release any air bubbles. The surface should be relatively smooth.
Pour the cheesecake mixture over the brownie batter. Use an offset spatula to spread it gently to the edges. Don’t press hard or you’ll disturb the brownie layer. The cheesecake will level itself during baking.
Drop spoonfuls of raspberry sauce randomly across the cheesecake layer. Use a butter knife or skewer to create swirls by dragging it through the sauce in figure-eight patterns. Don’t overswirl or you’ll muddy the colors. Three to four swirls create the best marbled effect.
Bake for thirty to thirty-five minutes. The edges should look set and slightly pull away from the pan. The center will jiggle slightly when you gently shake the pan. This means the brownies are perfectly fudgy. Overbaking creates dry, cake-like texture.
Cooling and Cutting
Remove the pan from the oven and place it on a wire rack. Let it cool at room temperature for thirty minutes. The brownies continue cooking from residual heat during this time.
Transfer the entire pan to the refrigerator once cool enough to handle. Chill for at least two hours, but overnight works even better. Cold brownies cut cleanly without crumbling or smearing the layers.
Lift the brownie slab out of the pan using the parchment overhang. Place it on a cutting board. Use a heart-shaped cookie cutter to cut out shapes, pressing straight down and wiggling slightly to release.
Wipe the cutter clean between each cut for neat edges. You’ll get six to nine hearts depending on cutter size. Save the scraps for snacking or crumble them over ice cream.
Troubleshooting Common Issues
Cracked cheesecake layer means overbaking. Reduce oven temperature by twenty-five degrees next time or check five minutes earlier. The center should still jiggle slightly when you remove the pan.
Brownies that stick to the cutter need more chilling time. Pop them back in the fridge for another hour. Run the cutter under hot water and dry it before cutting for even cleaner releases.
Muddy swirl colors happen from overswirling. Use restraint when creating the pattern. Three to five gentle strokes through the raspberry sauce create definition without muddying the layers.
Dry brownies indicate overbaking. Set a timer for thirty minutes and check doneness then. Every oven runs differently, so yours might need less time. The center should look slightly underdone when you remove the pan.
Flavor Variations
Substitute strawberries or blackberries for the raspberry sauce. Each berry brings its own flavor profile. Strawberries taste sweeter and milder, while blackberries add earthier notes.
Add white chocolate chips to the brownie batter for extra richness. Fold in half a cup after mixing the dry and wet ingredients. The white chocolate creates pockets of creamy sweetness throughout.
Mix espresso powder into the brownie batter to intensify chocolate flavor. One teaspoon of instant espresso powder or coffee makes the chocolate taste more complex without adding coffee flavor.
Top finished brownies with chocolate ganache for extra decadence. Heat equal parts heavy cream and chocolate chips until melted, then drizzle over chilled heart-shaped brownies. Let the ganache set before serving.
Storage and Make-Ahead Tips
Store cut brownies in an airtight container in the refrigerator for up to four days. Layer them between parchment paper to prevent sticking. The cheesecake topping requires refrigeration for food safety.
Freeze individual brownies wrapped tightly in plastic wrap, then placed in a freezer bag for up to three months. Thaw overnight in the refrigerator before serving. The texture remains fudgy and moist after freezing.
Make the raspberry sauce up to four days ahead and refrigerate in a covered container. Prepare the brownie dry mix and store in an airtight container at room temperature for months. This breaks the work into manageable steps.
Bake the brownies up to two days before you need them. Keep them uncut in the pan, covered with plastic wrap, in the refrigerator. Cut into hearts the day you plan to serve for the freshest presentation.
Serving Suggestions
Dust finished brownies with powdered sugar just before serving for elegant presentation. Use a fine-mesh strainer to create an even coating. The white powder contrasts beautifully against the dark chocolate.
Serve each brownie on a white plate with fresh raspberries and a drizzle of extra raspberry sauce. Add a small dollop of whipped cream for restaurant-quality plating. The bright berries make the dessert pop visually.
Pack individual brownies in clear cellophane bags tied with red ribbon for Valentine’s Day gifts. Include a card with storage instructions. Homemade treats in beautiful packaging mean more than anything store-bought.
Pair these brownies with coffee, dessert wine, or champagne for an adult dessert experience. The tangy cheesecake and bright raspberry complement sparkling wine beautifully. Coffee brings out the deep chocolate notes.
Dietary Adaptations
For gluten-free brownies, substitute a one-to-one gluten-free flour blend for the all-purpose flour. Make sure it contains xanthan gum for proper texture. The brownies will be slightly more delicate but just as fudgy.
Reduce sugar by using a granulated sweetener substitute in the brownie layer. Keep the full sugar amount in the cheesecake layer for proper texture. Sugar substitutes sometimes create grainy texture in cheesecake.
The cheesecake layer makes this recipe unsuitable for dairy-free diets. You can omit it entirely and make plain raspberry swirl brownies. They’re still delicious without the cheesecake component.
FAQ
Can I use store-bought raspberry jam instead of making sauce?
Yes, thin seedless raspberry jam with a teaspoon of water until it reaches pourable consistency. Homemade sauce tastes brighter and more natural, but jam works in a pinch when you’re short on time.
Why do I need to chill the brownies before cutting?
Chilling firms up the cheesecake layer and makes the brownies structurally stable. Warm brownies crumble when cut and the layers smear together. Cold brownies cut cleanly into perfect hearts.
Can I make these in a different pan size?
A nine-inch square pan creates thinner brownies that bake in twenty-five to thirty minutes. A nine-by-thirteen-inch pan makes very thin brownies unsuitable for cutting into shapes. Stick with eight-inch square for best results.
What if I don’t have a heart-shaped cutter?
Cut the brownies into regular squares or rectangles. They taste just as amazing without the heart shape. You can also use any cookie cutter shape for different occasions.
How do I know when the brownies are done baking?
The edges should pull slightly away from the pan and look set. The center will jiggle gently when you shake the pan. A toothpick inserted near the edge should come out with a few moist crumbs, not wet batter.
Can I freeze the brownies before cutting them?
Yes, wrap the entire uncut slab tightly in plastic wrap and aluminum foil. Freeze for up to three months. Thaw overnight in the refrigerator, then cut into hearts while still cold.
Why is my cheesecake layer lumpy?
Your cream cheese wasn’t soft enough. Cold cream cheese creates lumps that don’t smooth out with mixing. Always let cream cheese sit at room temperature for at least an hour before using.
Heart Shaped Brownies
Ingredients
Equipment
Method
- Make raspberry sauce: Combine raspberries, 1 tablespoon sugar, and 1 teaspoon vanilla in small saucepan over medium heat. Simmer 5-8 minutes until thickened. Strain through fine-mesh strainer to remove seeds. Set aside to cool.
- Prepare cheesecake topping: Beat room-temperature cream cheese with ⅓ cup sugar using electric mixer until smooth, about 1 minute. Add 1 egg and ½ teaspoon vanilla, beating on low just until combined. Set aside.
- Preheat and prep: Preheat oven to 350°F (175°C). Line 8×8-inch square pan with parchment paper, leaving overhang on two sides for easy removal.
- Mix brownie dry ingredients: In medium bowl, whisk together flour, sifted cocoa powder, and salt. Set aside.
- Mix brownie wet ingredients: In large bowl, whisk oil, 1½ cups sugar, and 1 tablespoon vanilla until combined. Add 3 eggs one at a time, whisking vigorously after each until mixture becomes glossy.
- Combine brownie batter: Fold dry ingredients into wet ingredients just until no streaks remain. Don’t overmix. Batter will be thick and glossy.
- Assemble layers: Pour brownie batter into prepared pan and spread evenly. Pour cheesecake mixture over brownie layer and spread gently to edges. Drop spoonfuls of cooled raspberry sauce randomly across surface.
- Create swirl: Use butter knife or skewer to swirl raspberry sauce through cheesecake in figure-eight pattern. Don’t overswirl or colors will muddy.
- Bake: Bake 30-35 minutes until edges are set and center jiggles slightly when gently shaken. Don’t overbake. Cool on wire rack 30 minutes.
- Chill and cut: Refrigerate at least 2 hours or overnight. Lift from pan using parchment overhang. Use heart-shaped cookie cutter to cut shapes, wiping cutter clean between cuts.
Notes
- Room temperature matters: Cold cream cheese and eggs create lumps. Let sit at counter 1 hour before starting.
- Don’t overbake: Center should jiggle slightly. Brownies continue cooking as they cool.
- Chill thoroughly: At least 2 hours ensures clean cuts. Overnight is even better.
- Storage: Refrigerate in airtight container up to 4 days. Freeze wrapped brownies up to 3 months.
- Cookie cutter tip: Run under hot water and dry between cuts for cleanest releases.