My first attempt at making Red Velvet Macarons was a complete disaster. The shells cracked, the feet didn’t form, and I nearly gave up on macarons altogether. But after three years of trial and error, I finally cracked the code to these stunning cookies. Now they’re my go-to dessert whenever I want to impress someone special.
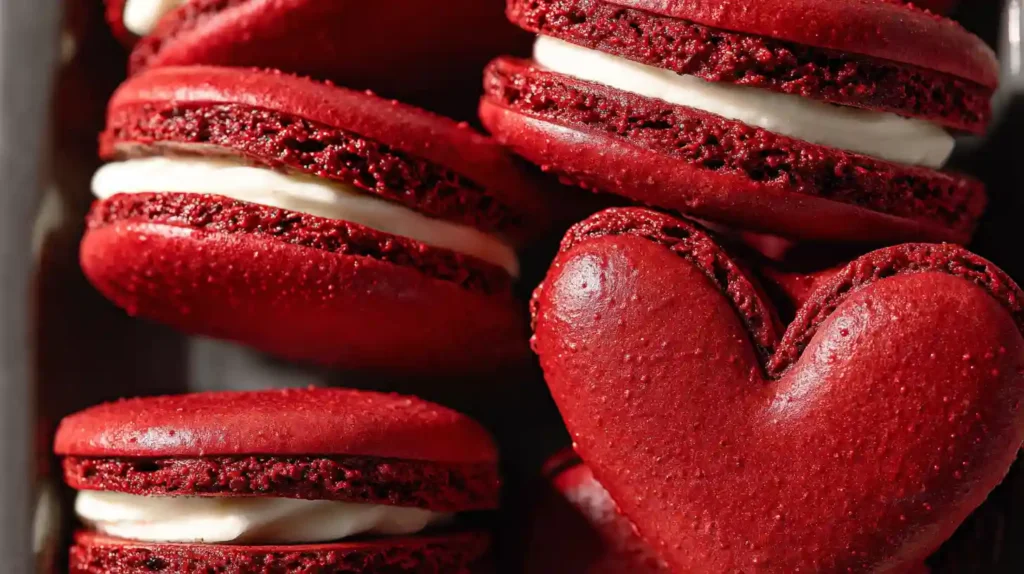
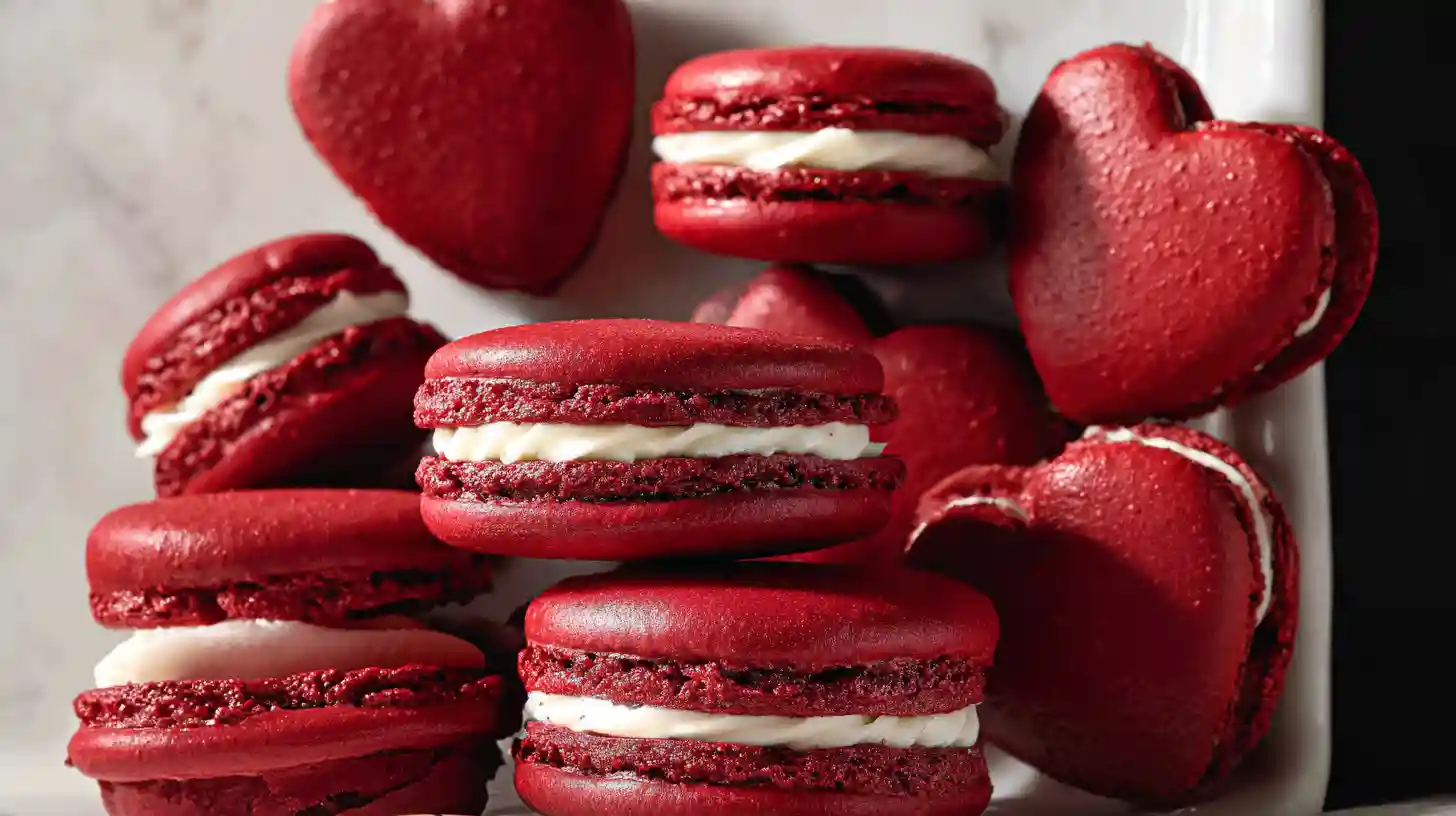
Red velvet flavor transforms into something magical when you pair it with delicate macaron shells. That subtle cocoa taste combined with the creamy mascarpone filling creates a dessert that looks as stunning as it tastes. These cookies take patience and precision, but watching someone bite into a perfect macaron makes every careful step worthwhile.
The secret to successful Red Velvet Macarons lies in understanding your meringue. Too stiff and your shells crack. Too soft and they spread flat. Getting that perfect glossy ribbon consistency took me dozens of batches to master, but the technique becomes second nature once you know what to look for.
Why These Macarons Stand Out
Most red velvet desserts rely heavily on food coloring for that signature shade. These macarons achieve their color naturally from cocoa powder combined with just a touch of gel color. The result looks more sophisticated and tastes infinitely better than artificially colored versions.
The mascarpone frosting brings everything together beautifully. Unlike buttercream which can overpower delicate macaron shells, mascarpone stays light and tangy. It complements the cocoa without competing with it.
Making macarons requires attention to detail that some bakers find intimidating. But honestly, once you master the basic technique, these cookies become surprisingly straightforward. You just need to respect the process and not rush through the critical steps.
Essential Ingredients
Quality ingredients make an enormous difference with macarons. Cheap almond flour produces gritty shells. Low-fat mascarpone won’t whip properly. Invest in good stuff and your results will reflect it.
- 1 cup almond flour, extra fine grind
- 1¾ cups powdered sugar
- 2 tablespoons Dutch-process cocoa powder
- 3 large egg whites, room temperature
- ¼ cup granulated sugar
- 1 teaspoon vanilla extract
- Red gel food coloring, 3-4 drops
- ½ cup cold heavy whipping cream
- ½ cup mascarpone cheese, room temperature
- ¼ cup powdered sugar for frosting
Dutch-process cocoa gives you that authentic red velvet flavor. Natural cocoa tastes too acidic and throws off the color. The extra fine almond flour is non-negotiable. Regular grind leaves visible specks on your shells.
Gel food coloring works far better than liquid. You need less of it, which means you won’t thin out your meringue. Start with just two drops. You can always add more.
Mastering the Technique
Start by sifting your almond flour, powdered sugar, and cocoa powder together twice. Yes, twice. This step prevents lumps and creates those smooth, professional-looking shells everyone admires.
Heat your egg whites and granulated sugar in a double boiler, whisking constantly until the sugar completely dissolves. This creates a Swiss meringue, which produces more stable shells than the French method. You’ll know it’s ready when the mixture feels smooth between your fingers, not grainy.
Transfer the warm egg whites to your stand mixer and whip on high speed. Add the vanilla and food coloring once soft peaks form. Keep whipping until you achieve stiff, glossy peaks. The meringue should cling to the bowl when you flip it upside down.
Now comes the macaronage, which is just a fancy French word for folding. Add your dry ingredients in three batches, folding gently with a silicone spatula. Scrape around the sides of the bowl, then cut through the center. Repeat this motion until the batter flows like lava.
Test the consistency by lifting your spatula and letting the batter fall back into the bowl. It should form a ribbon that disappears back into the mixture within 10 seconds. Too thick and your shells will crack. Too thin and they’ll spread flat without forming feet.
Piping and Baking
Transfer the batter to a piping bag fitted with a round tip. Pipe circles about 1.5 inches in diameter onto parchment-lined baking sheets. Hold the bag straight up and down, not at an angle. Apply steady pressure and release just before lifting up.
Tap the pans firmly on your counter five or six times. This releases air bubbles that would otherwise create holes in your shells. Let the piped macarons sit at room temperature for 30 to 45 minutes. They need to form a skin that doesn’t stick to your finger when gently touched.
Bake at 300 degrees F for about 14 minutes. The shells should not wobble when you gently touch the top. Cool completely on the pan before attempting to remove them. Rushing this step guarantees broken shells.
Creating the Mascarpone Filling
While your shells cool, make the filling. Beat the cold heavy cream until soft peaks form. In a separate bowl, mix the mascarpone with powdered sugar until smooth. Fold the whipped cream into the mascarpone mixture gently, preserving as much air as possible.
The filling should be thick enough to hold its shape when piped but still creamy. If it seems too soft, refrigerate for 15 minutes. Too stiff means you overmixed the mascarpone.
Pro Tips for Success
- Age your egg whites overnight in the fridge for more stable meringue
- Weigh ingredients on a kitchen scale for consistent results every single time
- Use parchment paper, not silicone mats, which can cause spreading
- Match shell sizes by piping them over traced circles on paper
- Store filled macarons in the fridge for 24 hours before serving for best texture
Creative Variations
Swap the mascarpone filling for cream cheese frosting if you want something tangier. Add a tablespoon of cocoa to the frosting for double chocolate intensity.
Try white chocolate ganache instead of mascarpone for an ultra-rich filling. Melt 4 ounces white chocolate with 2 tablespoons heavy cream, cool completely, then whip until fluffy.
Make mini macarons by piping smaller circles. Reduce baking time to 10 minutes. These bite-sized versions work perfectly for parties.
Troubleshooting Common Issues
Cracked shells mean your oven temperature is too high or you didn’t tap out enough air bubbles. Try reducing the temperature by 25 degrees.
No feet forming indicates your meringue was overbeaten or the batter was overmixed. The shells might also not have dried long enough before baking.
Hollow shells result from undermixing the batter or baking at too high a temperature. The outside sets before the inside cooks through.
Lopsided macarons mean your oven has hot spots. Rotate the pan halfway through baking and consider using an oven thermometer.
Ingredient Substitutions
Cannot find mascarpone? Use full-fat cream cheese beaten until fluffy. The flavor will be slightly tangier but still delicious.
For nut-free versions, try sunflower seed flour. The texture won’t be identical but it works surprisingly well.
Replace vanilla extract with almond extract for a subtle nutty undertone. Use only half a teaspoon as almond extract is much stronger.
Storage and Serving
Unfilled macaron shells stay fresh in an airtight container at room temperature for up to five days. Freeze them for up to three months.
Once filled, these Red Velvet Macarons must be refrigerated. They keep for up to five days and actually taste better after 24 hours when the filling softens the shells slightly.
Bring refrigerated macarons to room temperature 20 minutes before serving. The flavors bloom and the texture becomes perfectly chewy.
Package them in clear boxes tied with ribbon for gorgeous Valentine’s Day gifts. Stack them carefully with parchment paper between layers.
FAQ
Can I make these without a stand mixer?
Technically yes, but a hand mixer makes achieving stiff peaks much harder. Your arm will get tired and the meringue might not whip properly. A stand mixer really is the better tool here.
Why do my macarons always crack?
Cracking usually means oven temperature is too high or you didn’t let the shells dry long enough before baking. Try lowering your oven by 25 degrees and giving them an extra 10 minutes to form a skin.
How do I know when the batter is mixed enough?
The figure-eight test works perfectly. Lift your spatula and let batter fall back into the bowl. Draw a figure eight. If the ribbon holds its shape for more than a few seconds, keep folding. If it disappears immediately, you’ve gone too far.
Can I use liquid food coloring instead of gel?
You can, but the extra liquid might throw off your batter consistency. Gel coloring is concentrated, so you need less. Stick with gel for best results.
Do I really need to age the egg whites?
Aged egg whites whip up more stable and create better feet. That said, room temperature fresh egg whites can work. Aging just gives you better insurance against failure.
What’s the difference between French and Swiss meringue methods?
French method adds sugar directly to raw egg whites. Swiss method heats the sugar and eggs together first. Swiss creates more stable, foolproof shells, especially for beginners.
Can I freeze filled macarons?
Absolutely. Freeze them on a baking sheet until solid, then transfer to a container. They keep frozen for up to two months. Thaw in the fridge overnight before serving.
Red Velvet Macarons
Ingredients
Equipment
Method
- Sift the almond flour, powdered sugar, and cocoa powder together twice into a medium bowl. Set aside.
- In a heatproof bowl, combine egg whites and granulated sugar. Place over a pot of simmering water (double boiler). Whisk constantly for 2-3 minutes until sugar completely dissolves and mixture reaches 120°F. Test by rubbing a small amount between your fingers – it should feel smooth, not grainy.
- Transfer the warm egg white mixture to your stand mixer bowl. Beat on medium-high speed until soft peaks form. Add vanilla extract and red gel food coloring. Continue beating on high speed until stiff, glossy peaks form and the bowl can be turned upside down without the meringue moving.
- Add one-third of the sifted dry ingredients to the meringue. Fold gently with a silicone spatula, scraping around the sides of the bowl and cutting through the center. Add remaining dry ingredients in two more additions, folding until just combined.
- Continue folding by spreading the batter against the sides of the bowl to deflate it slightly. Test consistency by lifting the spatula and letting batter fall back – it should form a ribbon that disappears within 10 seconds. The batter should flow smoothly and you should be able to draw a figure eight without the ribbon breaking.
- Transfer batter to a piping bag fitted with a round tip. Line baking sheets with parchment paper. Pipe circles about 1.5 inches in diameter, spacing them 2 inches apart. Hold the bag perpendicular to the pan and pipe with steady pressure.
- Firmly tap the baking sheets on the counter 5-6 times to release air bubbles. Let piped macarons sit at room temperature for 30-45 minutes until they form a skin that doesn’t stick when gently touched.
- Preheat oven to 300°F. Bake macarons for 13-15 minutes until they don’t wobble when gently touched. Cool completely on the baking sheet before removing.
- For the filling: Beat heavy cream until soft peaks form. In a separate bowl, mix mascarpone with powdered sugar until smooth. Gently fold whipped cream into mascarpone mixture.
- Match up macaron shells by size. Pipe or spread filling on the flat side of one shell, then sandwich with another shell. Press gently. Refrigerate filled macarons for 24 hours before serving for best texture.
Notes
- Aging egg whites: Separate eggs the night before and refrigerate uncovered for more stable meringue.
- Measuring accurately: Use a kitchen scale for best results. Almond flour especially varies by volume measurement.
- Oven temperature: Every oven bakes differently. Use an oven thermometer and adjust temperature if needed.
- Storage: Unfilled shells keep 5 days at room temperature or 3 months frozen. Filled macarons keep refrigerated for 5 days.